Events are one of the most powerful sources of contact data in Positive User. Each event records a specific action a contact takes on your website - clicking a button, watching a video, or performing other actions - and feeds that data into your workspace, where it can trigger automations and drive segmentation. To learn more, see "What is an Event".
Google Tag Manager (GTM) lets you set up event tracking without touching your website's code.
This article uses a click on a "Reviews" button on a product page as the running example, passing the related “product_id” and “product_name” along with the event. The same pattern applies to any other action - form submissions, scroll depth, video interactions, and so on. So, adapt Steps 1-3 to whichever action you want to track.

The implementation script must be live in your GTM container. Check “How to Implement Positive User With Google Tag Manager" [LINK].
Event must be created in your Positive User workspace with all required attributes. Check “What Is an Event”.
This step should be performed in your GTM container.
Go to "Variables" → "Configure".
Check all variables in the "Clicks" section (Click Text, Click URL, Click Classes, Click ID).
For non-click actions, enable the matching set instead (Videos, Scroll, etc.).
Open your website in GTM "Preview" mode.
Click on the element you want to connect the event with.
In Tag Assistant, select the click event in the timeline.
Open the "Variables" tab and copy the value of the variable that uniquely identifies this element.
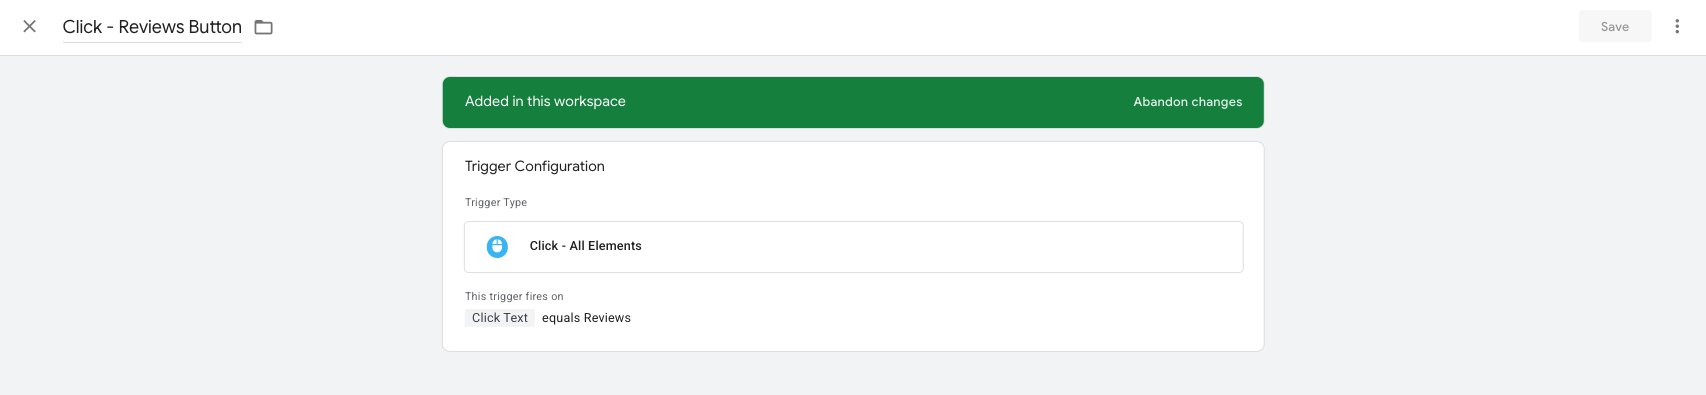
In the example below, we use “Click Text” with the value "Reviews" to identify clicks on the button.
Go to "Triggers" → "New" in your GTM container.
Set "Trigger Type" to "Click - All Elements".
Select "Some Clicks".
Configure the condition using the variable from Step 2 (e.g. Click Text equals Reviews).
Save and name the trigger (e.g. "Click - Reviews Button").
Along with the event you can send additional details - attributes.
In a current example the event will carry “product_id” and “product_name” attributes. They are pulled from your dataLayer. Most e-commerce platforms (Shopify, Magento, WooCommerce, PrestaShop) populate these on product pages automatically. To check if it works fine on your website open GTM "Preview" mode, load a product page, and inspect the "Data Layer" tab in Tag Assistant.
For each attribute:
Go to "Variables" → "New" → "Data Layer Variable" in your GTM container.
In "Data Layer Variable Name", enter the exact dataLayer key (e.g., product.id, product.name).
Save the variable with a recognizable name (e.g., “DLV - product_id”, “DLV - product_name”).
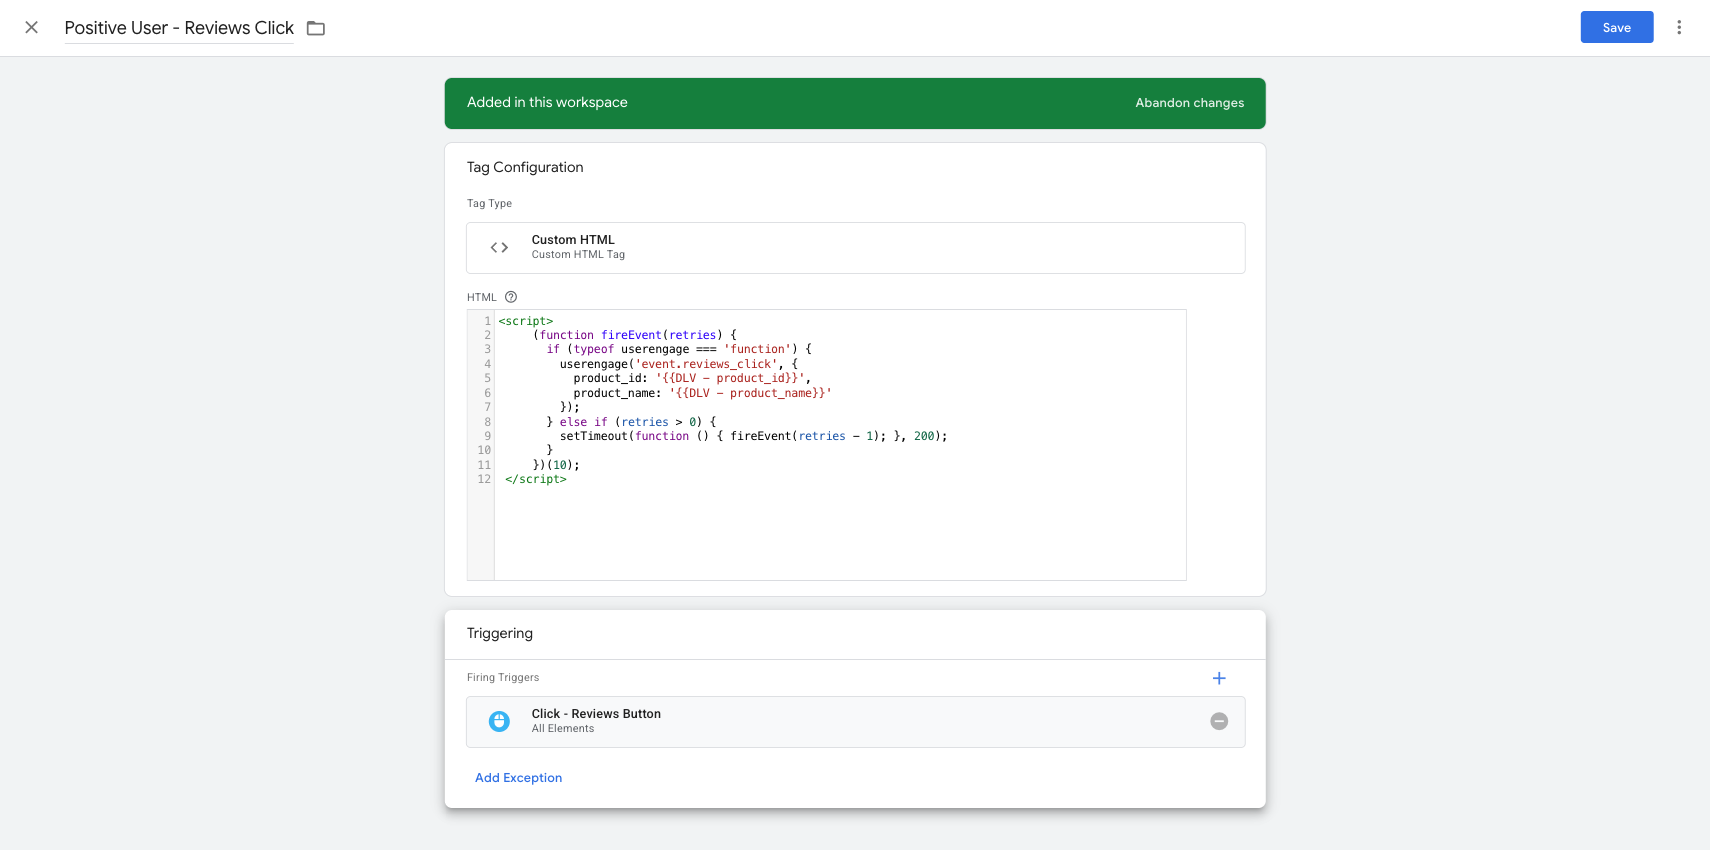
Go to "Tags" → "New" → "Tag Configuration" → "Custom HTML" in your GTM container.
Paste:
<script>
     (function fireEvent(retries) {
       if (typeof userengage === 'function') {
         userengage('event.reviews_click', {
           product_id: '{{DLV - product_id}}',
           product_name: '{{DLV - product_name}}'
         });
       } else if (retries > 0) {
         setTimeout(function () { fireEvent(retries - 1); }, 200);
       }
     })(10);
   </script>
Set the trigger to your action trigger from Step 3.
Save.
The script checks whether userengage() is available on the page. If it is, the event is sent immediately. If not, it retries every 200 ms up to 10 times (~2 seconds total) and then gives up silently - no console errors, no broken page. Adjust the retry count and delay to match your site's load profile.
In GTM, click "Preview" and open your website.
Trigger the action.
In Tag Assistant, confirm the event tag fired.
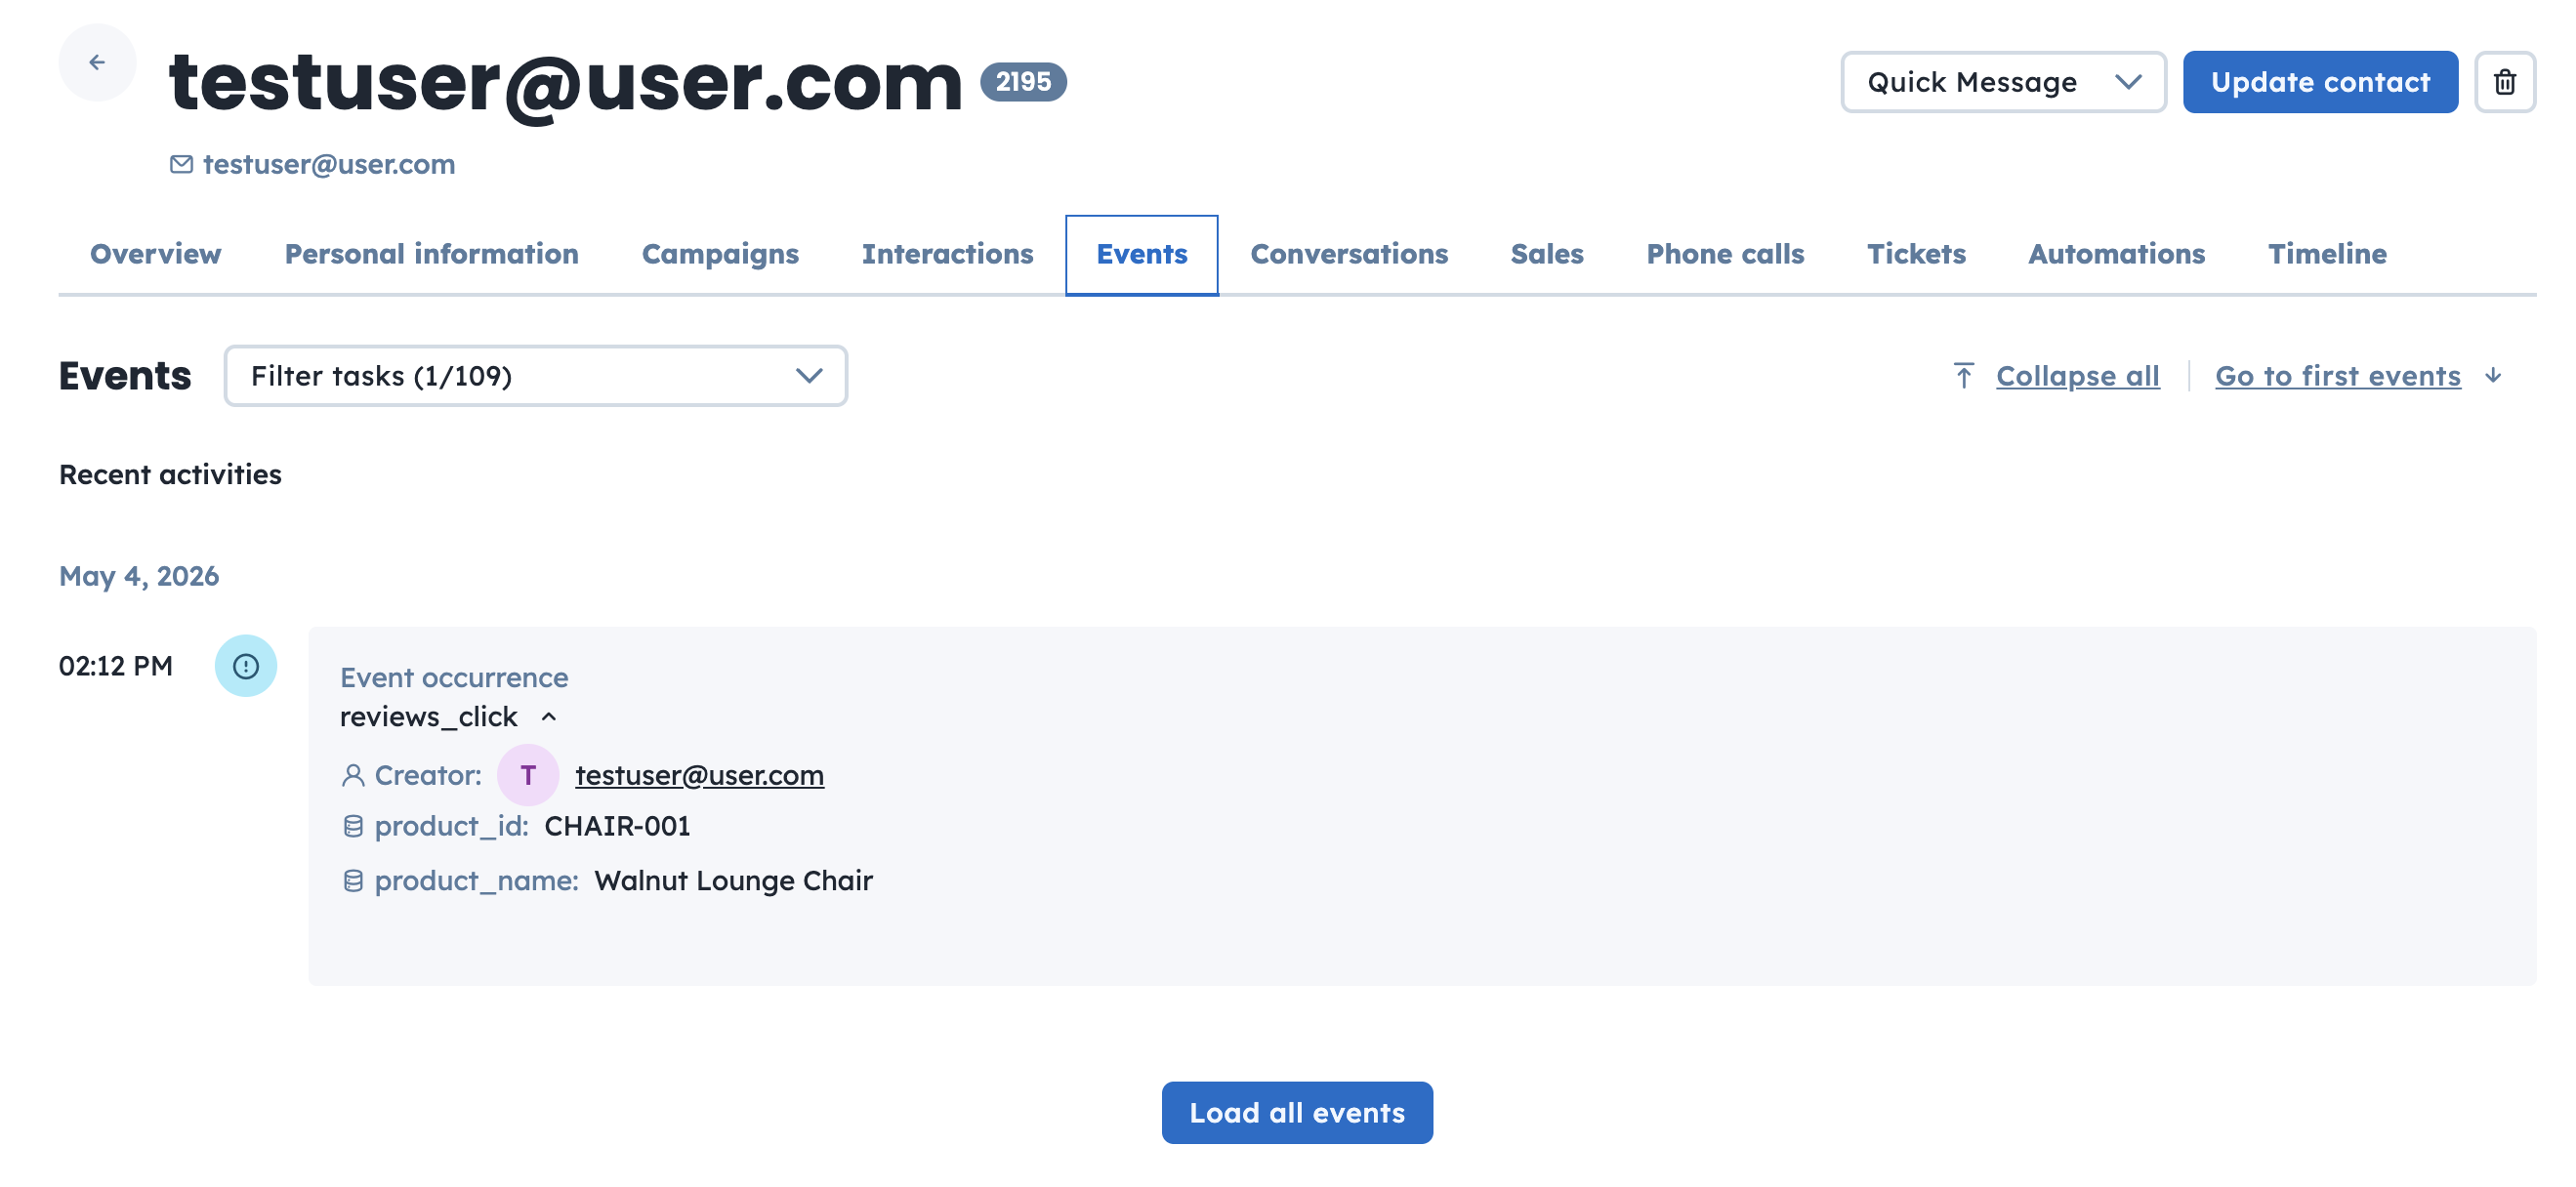
In your Positive User workspace, open the contact's profile - the event should appear on their timeline with the correct attributes.
You can pass any number of attributes in the second argument of userengage(). For example, “Category”, “Price”, or “Currency.”
Use the same data formatting rules as for contact attributes. Remember to set suitable type for each attribute according to the “What Is an Attribute” instruction . For the full reference, also check the developer documentation.
Some events should fire exactly once per page rather than on every action - for example, a “qualified_visit” event that records when a contact has stayed on a product page long enough to be considered engaged. For cases like this, GTM's Trigger Group is the right tool.
A “Trigger Group” fires a tag exactly once when all its constituent triggers have fired at least once on the page. After that single fire, it stays silent for the rest of the page session - even if its constituents fire again. This makes it unsuitable for per-click or per-action tracking, but ideal for events that signal "this page has reached this state".
This approach uses the “Positive User - Widget Ready” dataLayer event that the implementation script's onLoad callback already pushes (configured in "How to Implement Positive User With Google Tag Manager" [LINK]).
Because the widget-ready trigger is part of the group, the event is guaranteed to wait until userengage() is available - no defensive coding is needed.
Example: send a “qualified_visit” event when the widget is loaded and the contact has spent 10 seconds on the page.
Create a Timer trigger for the engagement signal:
Go to "Triggers" → "New" → "Timer" in your GTM container.
Set "Interval" to 10000 (10 seconds) and "Limit" to 1.
Save (e.g. as "Timer - 10s On Page").
Create a Custom Event trigger for the implementation script's onLoad signal:
Go to "Triggers" → "New" → "Custom Event" in your GTM container.
In "Event name", enter exactly: “Positive User - Widget Ready”.
Save (e.g. as "Custom Event - PU Widget Ready").
Create the Trigger Group:
Go to "Triggers" → "New" → "Trigger Group" in your GTM container.
Add both triggers from above.
Save (e.g. as "Qualified Visit - Widget Ready + 10s").
Create the event tag:
Go to "Tags" → "New" → "Tag Configuration" → "Custom HTML" in your GTM container.
Paste:
<script>
  userengage('event.qualified_visit', {
    product_id: '{{DLV - product_id}}',
    product_name: '{{DLV - product_name}}'
  });
</script>
Set the trigger to the Trigger Group from step 3.
Save.
The Trigger Group will fire once per page, when both conditions have been met. Reloading the page resets the group, so it will fire again on the next pageview. To capture per-action events that need to fire on every interaction, see the main step-by-step flow above.
How to Implement Positive User With Google Tag Manager [LINK]
