Google Tag Manager (GTM) is one of the recommended ways to deploy the Positive User tracking script on your website. Once GTM delivers the script, Positive User starts tracking visitors, creates contact profiles, and lets you enrich those profiles with the data that matters to your business.
This guide covers three things:
Installing the basic implementation script;
Identifying contacts with a Contact ID;
Extending the setup with additional contact data and callbacks.
An active Positive User workspace.
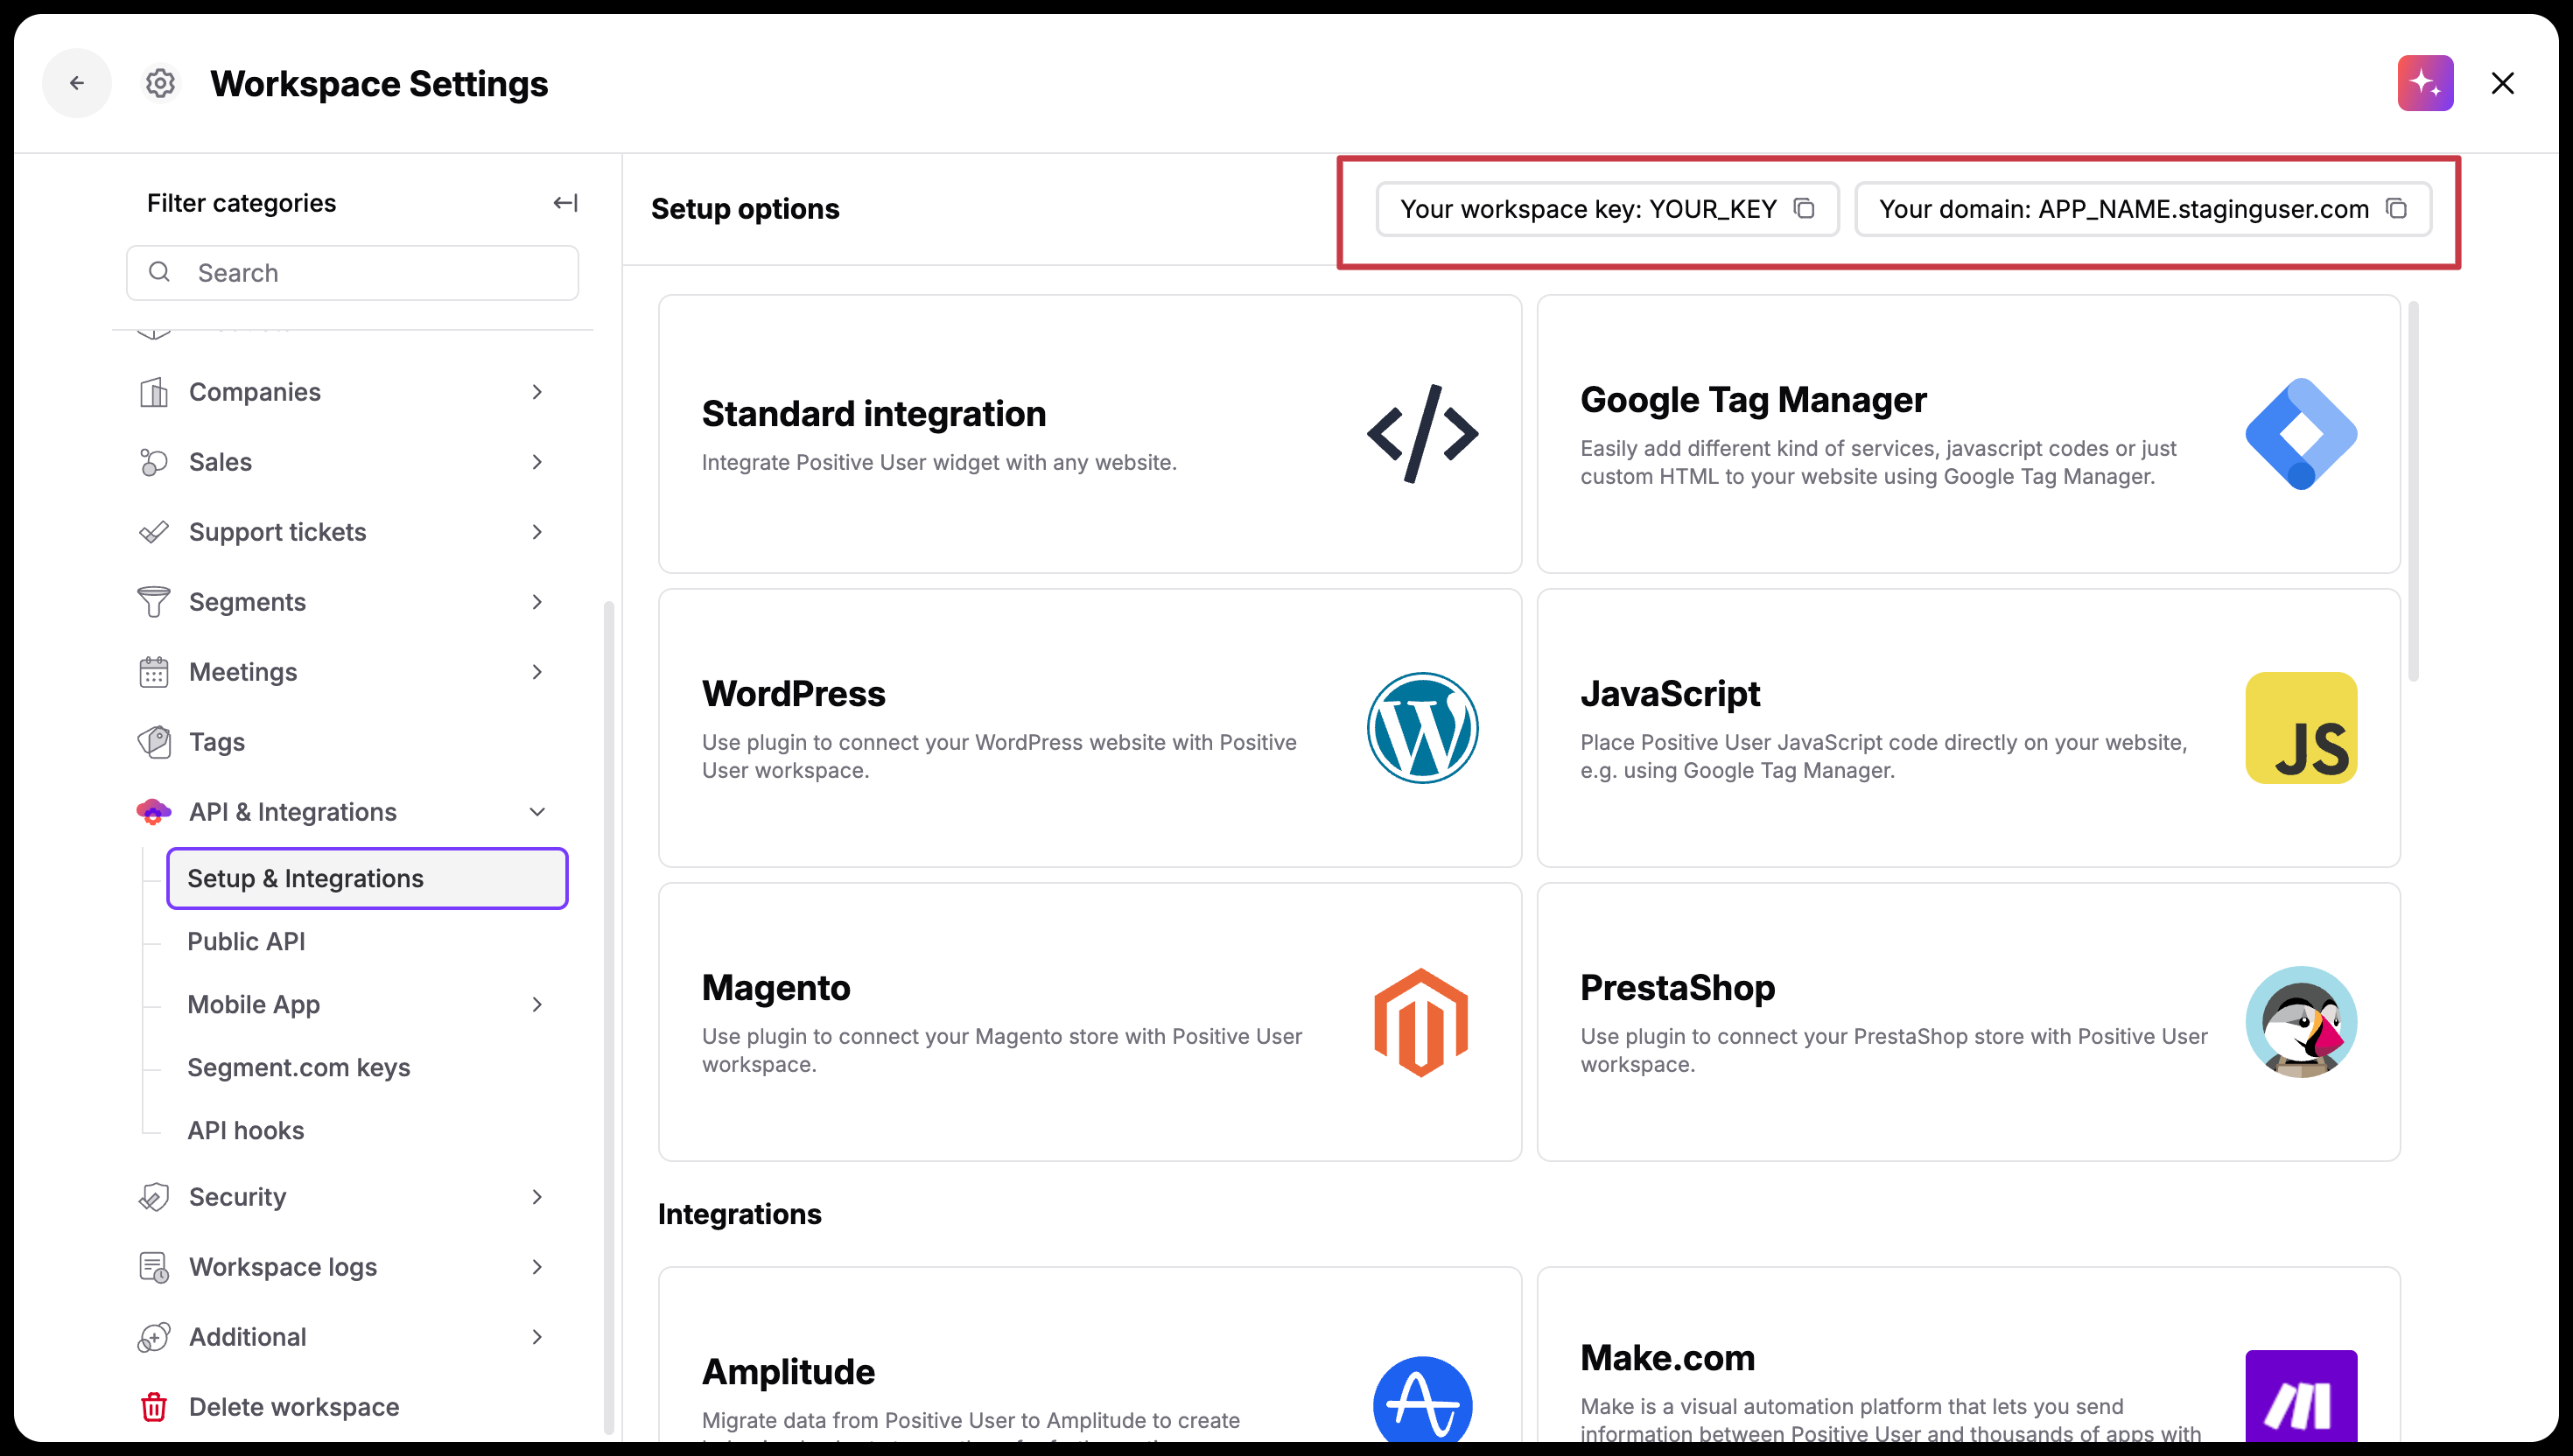
Workspace key and subdomain information (from “Workspace Settings” → “API & Integrations” → “Setup & Integrations” section).
Access to GTM container installed on your website.
Cookie/consent strategy in place.

The implementation script defines a configuration object (window.civchat) and then loads “widget.js”. Adding it through GTM means you can deploy, update, or pause it without touching the website code again.
Get Your Workspace Key and Subdomain
In your Positive User workspace, go to "Workspace Settings" → "API & Integrations" → “Setup & Integrations” to find your workspace key, and note your workspace subdomain (e.g. yourapp.user.com).
Create the Custom HTML Tag in GTM
Log in to your GTM container and go to "Tags" → "New" → "Tag Configuration" → "Custom HTML" and paste the script below. Replace YOUR_KEY with the workspace key from step 1, and yourapp.user.com with your workspace subdomain:
<script data-cfasync="false" type="text/javascript">
  window.civchat = {
    apiKey: 'YOUR_KEY'
  };
</script>
<script data-cfasync="false" src="https://yourapp.user.com/widget.js"></script>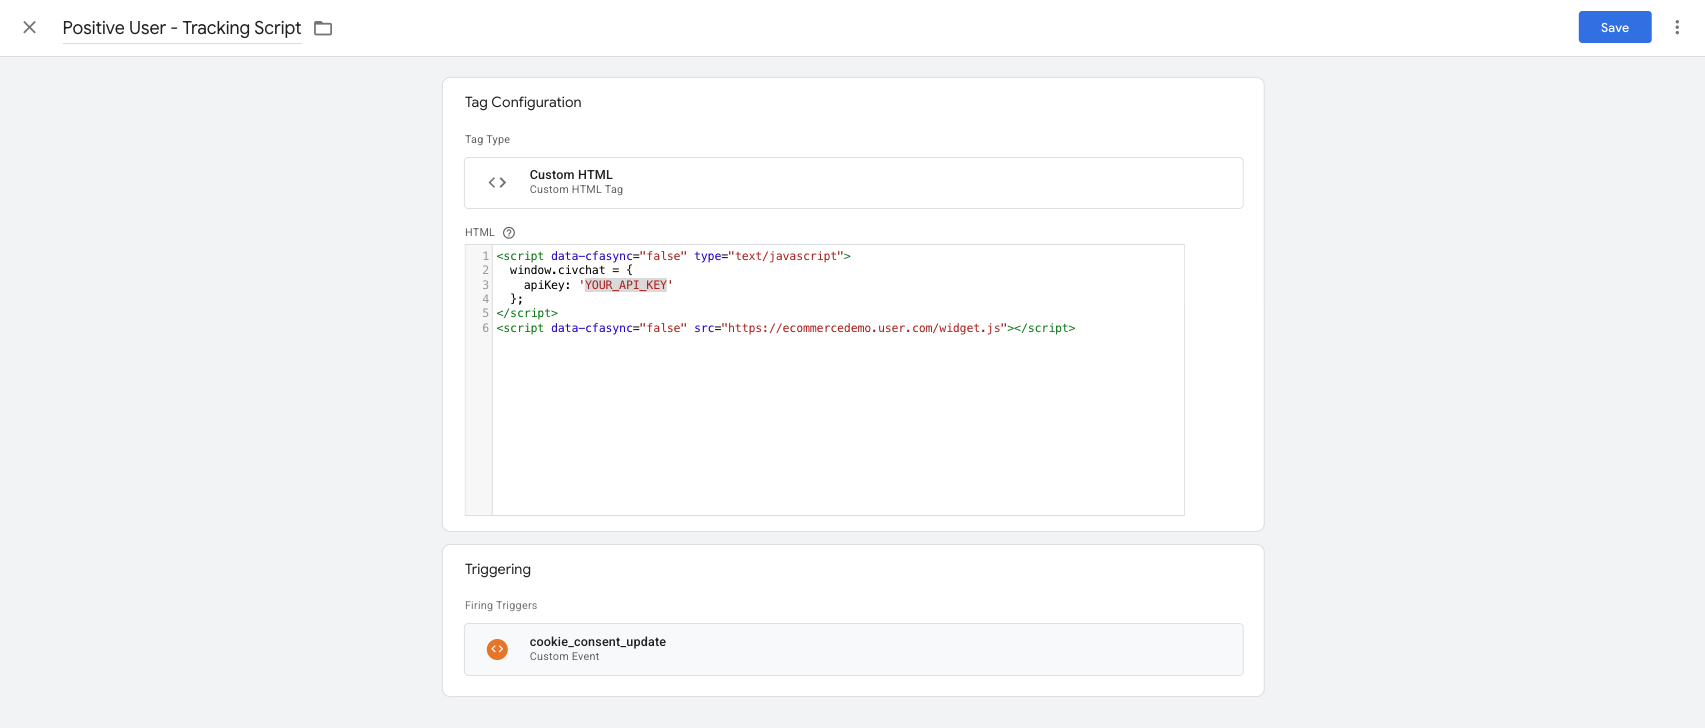
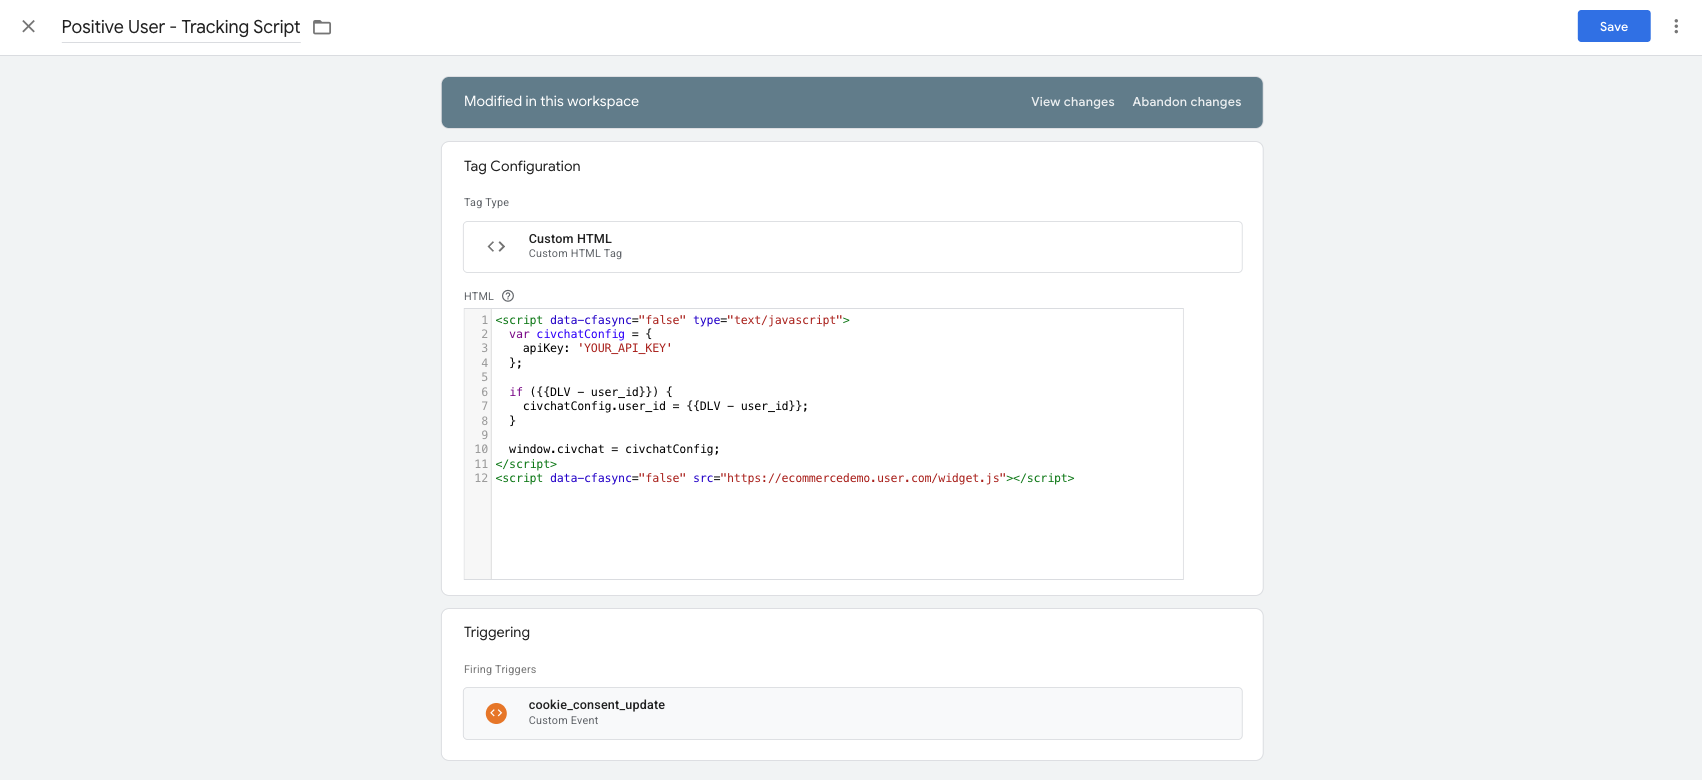
Set the Trigger in GTM container
Under "Triggering", choose the trigger that fits your consent setup - typically it’s a “cookie_consent_update” event (or its equivalent). So the script only loads after the visitor has accepted cookies. If you don't have a consent layer, "All Pages" works as a starting point.
Save, Preview, Publish
Name the tag (for example, "Positive User - Tracking Script"), click "Save", then run GTM's "Preview" mode to confirm the tag fires and the widget loads. Once verified, submit and publish the GTM container.
typeof UE === 'object' && typeof userengage === 'function'. If it returns true, Positive User is ready.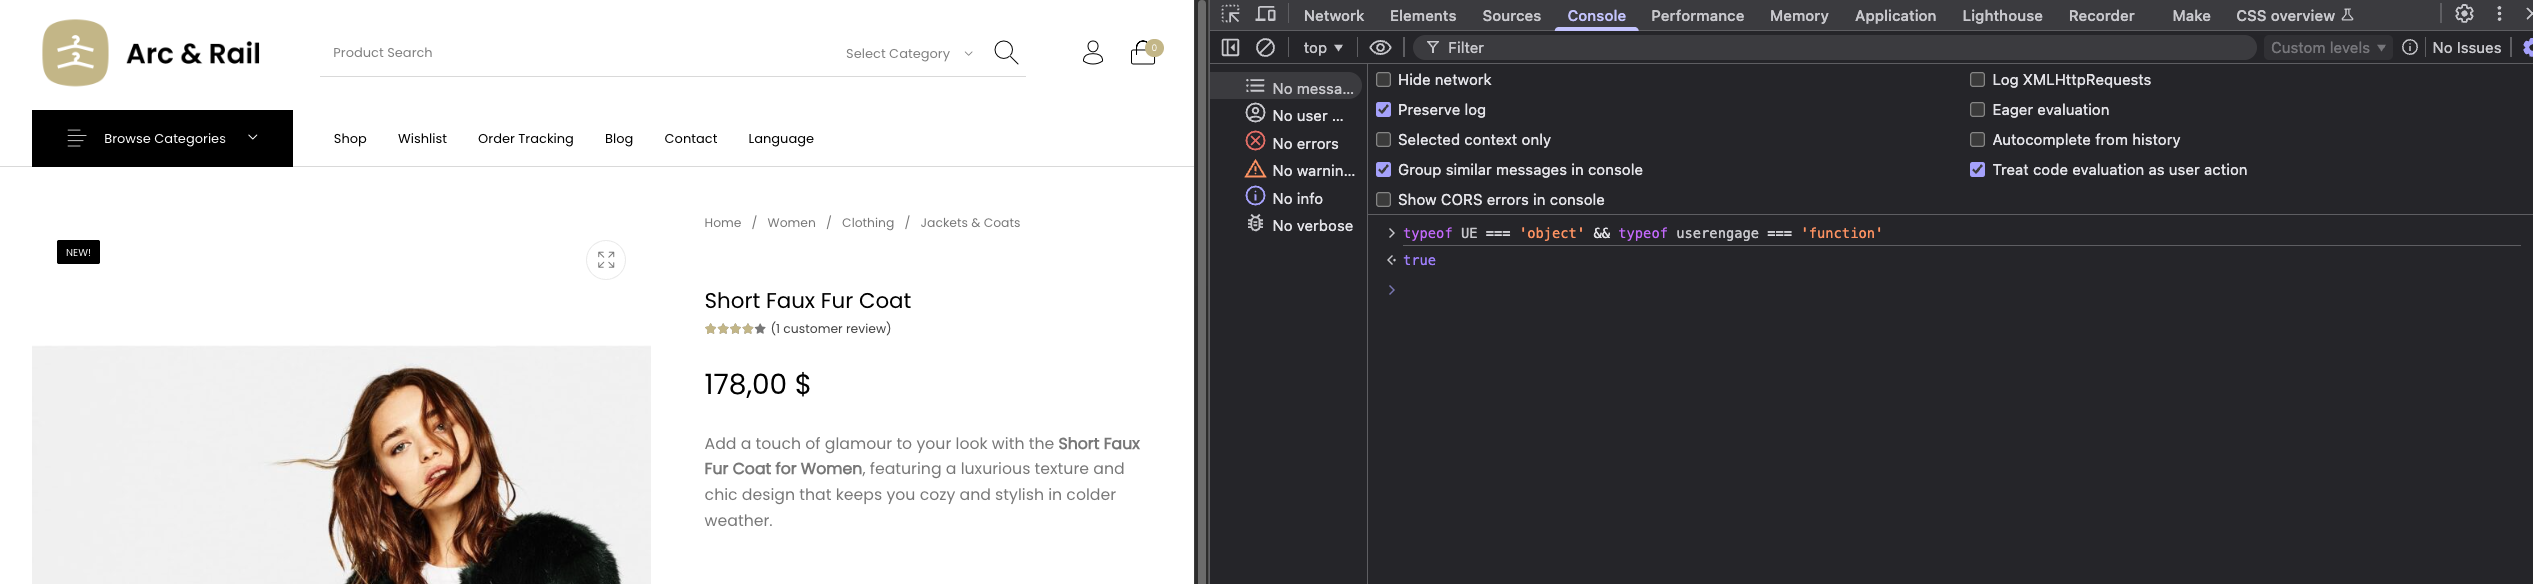
By default, Positive User tracks visitors anonymously using a cookie (__ca__chat). To turn an anonymous visitor into a recognized contact - and to keep their history consistent across devices and sessions - pass a Contact ID through the “user_id” field (attribute) on “window.civchat”.
Choosing the Right Contact ID
The value you use as the Contact ID depends on how your business identifies people. There is no single correct choice; it should be a stable, unique identifier that you can pass consistently across all touchpoints. The three commonly used options are:
Internal database ID: the most stable option, since it never changes even if the contact updates their email. Used in the examples in this article.
Lowercase email: simple to implement and readable in the workspace, but tied to the contact's current email address.
SHA-256 hash of the lowercase email: same uniqueness as the email, but no raw personal data passes through GTM or browser variables.
Read more about ID’s in our article. [LINK]
The Contact ID needs to be available when “window.civchat” is defined - which means before “widget.js” loads. The standard approach is to read it from the dataLayer your site populates for logged-in contacts, then assign it to the “civchat” object conditionally.
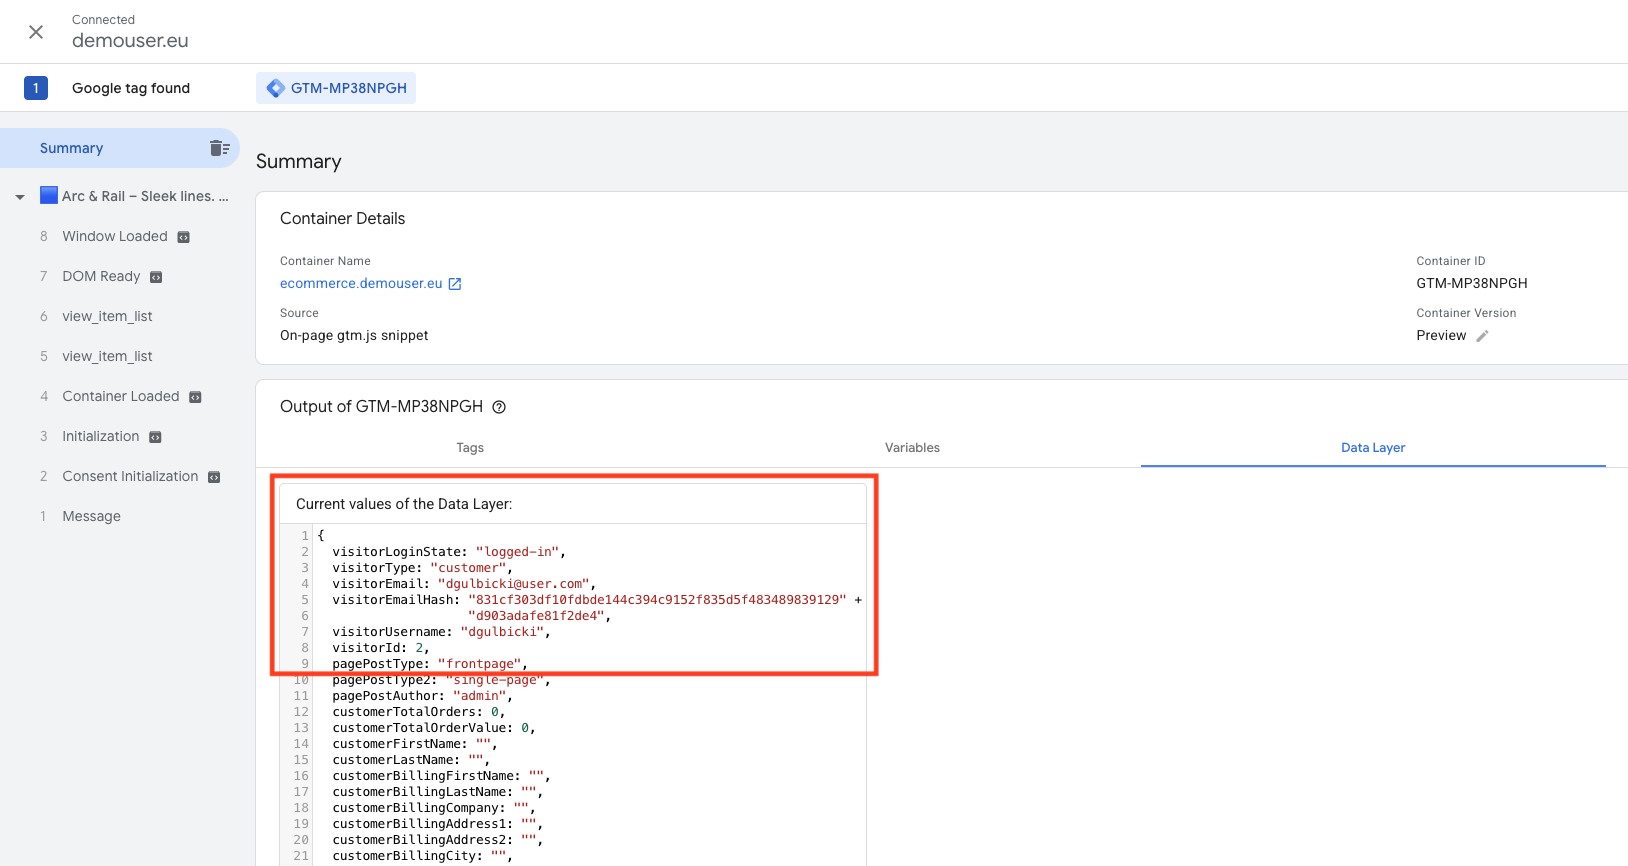
Find the Contact ID in Your dataLayer
On most e-commerce platforms (Magento, Shopify, WooCommerce, PrestaShop, etc.), the dataLayer is already populated with information about the logged-in customer - including a customer ID, email, and basic profile fields. You don't need to write any JavaScript yourself; you just need to know which dataLayer key holds the value you want to use as the Contact ID.
To check what's available:
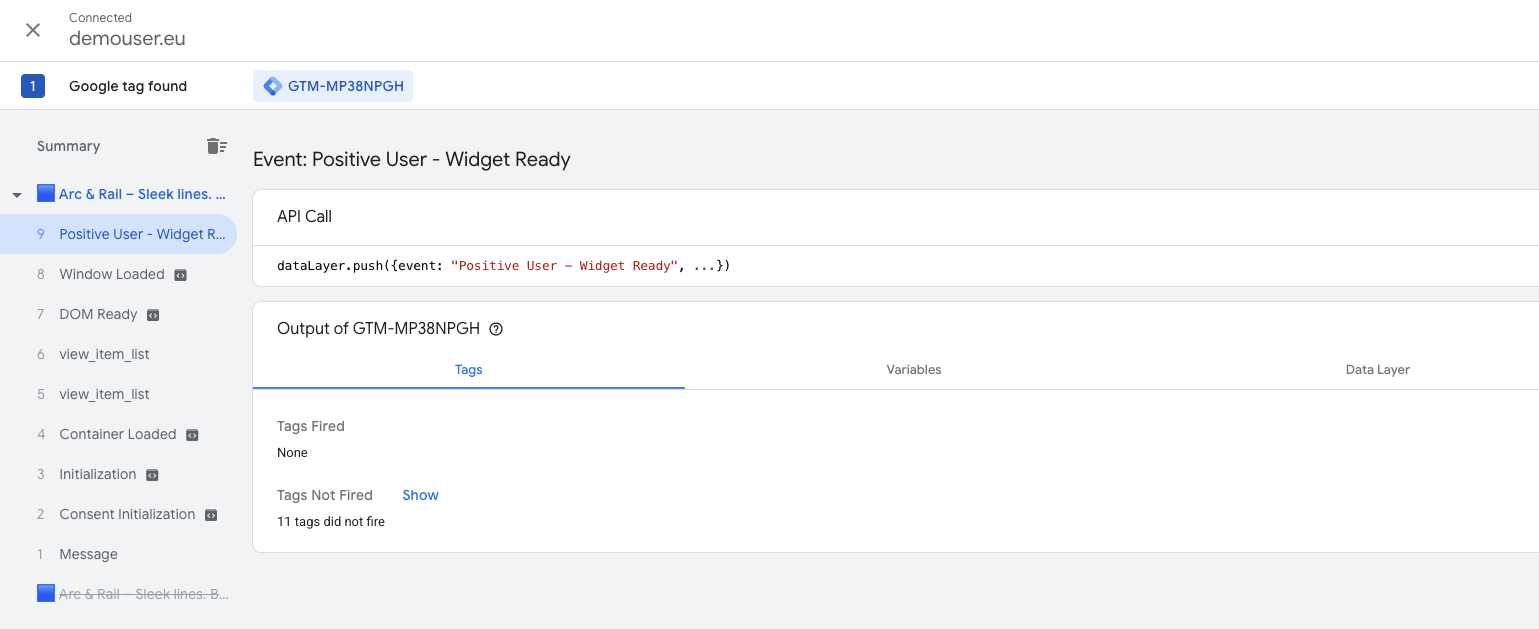
Open GTM and click "Preview" in the top right.
Enter your website URL and log in as a test customer in the preview window.
In the GTM Tag Assistant, open the "Data Layer" tab on any event.
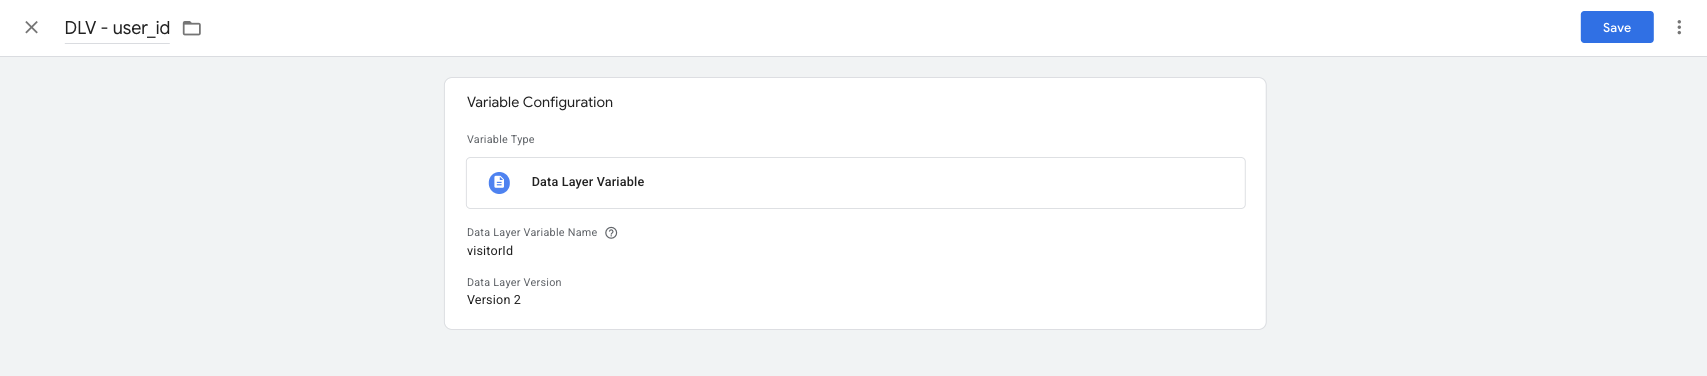
Look through the entries for an object containing customer or user information. Common key names include “visitorId”, “user_id”, “customerId”, or similar.
Create or Reuse a dataLayer Variable in GTM
In GTM, go to "Variables" and check whether a variable for your customer ID already exists - in containers set up by an agency or for an existing analytics integration, it often does. Look for variables of type "Data Layer Variable" pointing to keys like “customer_id” or “user_id”. If one is already there, you can reuse it and skip to the next step.
If it doesn't exist yet, go to "Variables" → "New" → "Data Layer Variable" and create one. In the "Data Layer Variable Name" field, enter the exact key name you found in your dataLayer (for example, “customer_id”). Name the variable something recognizable, such as “DLV - user_id”.
Update the Tag
Edit the Custom HTML tag and assign the Contact ID conditionally, so it is only added when the visitor is actually logged in:
<script data-cfasync="false" type="text/javascript">
  var civchatConfig = {
    apiKey: 'YOUR_KEY'
  };

  if ({{DLV - user_id}}) {
    civchatConfig.user_id = {{DLV - user_id}};
  }

  window.civchat = civchatConfig;
</script>
<script data-cfasync="false" src="https://yourapp.user.com/widget.js"></script>
When “user_id” is present, Positive User uses it as the primary identifier. If the ID already exists in your workspace, tracking switches to that contact's profile; if not, the ID is assigned to the current anonymous session and a new contact is created.
Once a contact is identified, you can enrich their profile with additional attributes - the data fields stored on the contact profile. Pass these values at the root level of the civchat configuration object, alongside “user_id”:
<script data-cfasync="false" type="text/javascript">
  var civchatConfig = {
    apiKey: 'YOUR_KEY'
  };

  if ({{DLV - user_id}}) {
    civchatConfig.user_id = {{DLV - user_id}};
    civchatConfig.email = {{DLV - user_email}};
    civchatConfig.first_name = {{DLV - user_first_name}};
    civchatConfig.last_name = {{DLV - user_last_name}};
    civchatConfig.phone_number = {{DLV - user_phone}};
    // Custom attributes go at the same level
    civchatConfig.plan_type = {{DLV - user_plan}};
  }

  window.civchat = civchatConfig;
</script>
<script data-cfasync="false" src="https://yourapp.user.com/widget.js"></script>
A few things to keep in mind:
Standard vs. custom attributes: Standard attributes (such as “Email”, “Phone number”, “Gender”, “Status”) are recognized by Positive User automatically. Custom attributes (such as “Plan type”) must already exist in the workspace - create them in advance under. (Check “How to Create a Custom Attribute”)
Format matters: Always choose a suitable type of the attribute as it defines further filter possibilities. For the full list of formatting rules, see the developer documentation or “What Is an Attribute” article.
Values overwrite existing data: Any attribute you pass here will replace the value already stored on the contact profile. Only pass attributes when you have a real value - that's why we keep them inside the “if” block above.
Callbacks let your code react to what is happening inside the Positive User widget - for example, when the widget finishes loading, or when a new chat message arrives. They are defined as functions inside the same “civchat” configuration object, alongside “apiKey” and “user_id”.
Available Callbacks
The Positive User SDK exposes the following callbacks:
onLoad: runs once the widget script and its resources have finished loading. Useful for sequencing other GTM tags that depend on Positive User being ready.
onMessage: runs every time a chat message is received. The “message: object includes an “isAdmin” flag indicating whether the message came from a team member/automation (true) or from the contact (false).
onOpen / onClose: runs when the chat widget is expanded or minimized.
onPayloadReceived: runs when the widget receives a payload from the "Send Code" automation module.
For full reference, see the developer documentation.
The script below shows a full setup combining everything from this guide: the onLoad callback, the Contact ID, the email, and additional contact data. This is the version you can use as a starting point in production:
<script data-cfasync="false" type="text/javascript">
  var civchatConfig = {
    apiKey: 'YOUR_KEY',

    // Notify GTM once the widget is fully loaded
    onLoad: function() {
      dataLayer.push({ event: 'Positive User - Widget Ready' });
    }
  };

  // Identify the contact and pass their data only when logged in
  if ({{DLV - user_id}}) {
    civchatConfig.user_id = {{DLV - user_id}};
    civchatConfig.email = {{DLV - user_email}};
    civchatConfig.first_name = {{DLV - user_first_name}};
    civchatConfig.last_name = {{DLV - user_last_name}};
    civchatConfig.phone_number = {{DLV - user_phone}};
    civchatConfig.plan_type = {{DLV - user_plan}};
  }

  window.civchat = civchatConfig;
</script>
<script data-cfasync="false" src="https://yourapp.user.com/widget.js"></script>
In GTM, you can then create a "Custom Event" trigger listening for “Positive User - Widget Ready” and use it on any tag that needs Positive User SDK to be available.
GTM is convenient, but it adds one extra layer between your website and Positive User. If the script does not seem to fire:
Check GTM's "Preview" mode to confirm the tag actually runs on the page.
Make sure the GTM container is published, not just saved.
Check the browser console for JavaScript errors that may stop the script from executing.
Confirm that ad blockers, consent management tools, or your CSP are not blocking GTM or the Positive User domain.
Verify dataLayer variables resolve correctly in Preview mode - if a variable is empty, the corresponding field on “civchat” will be empty too.
How to Configure a Chat Widget [LINK]
IDs Concept [LINK]
