Filtering inactive contacts helps your team clean your contact database, protect your sender reputation, and re-engage dormant audience members. By combining parameters like attributes, events, lists, and tags in Positive User, you can isolate contacts who have stopped interacting with your brand. You can then add these segments to automated win-back flows, multi-channel campaigns, or custom reporting dashboards. To learn more about contact parameters, read “Understanding How Filters Work”.

Follow these steps to define, filter, and save inactive contact segments in your workspace.
Before building filters, determine what qualifies as an inactive contact for your specific business model and goal. Because inactivity varies between e-commerce, SaaS, and service businesses, you must first establish what an active contact looks like:
Customer Win-Back: Identify past buyers who haven't visited your site, placed an order, or added items to their cart within a set timeframe.
Campaign Re-Engagement: Isolate contacts who have stopped opening or clicking your emails so you can exclude them from regular newsletter broadcasts (protecting deliverability) or send them dedicated win-back sequences.
Key Activity Parameters: Popular parameters include "Last seen", last “Purchase” date, last “Add to cart” event, last “Email link clicked”, and last “Email opened”.
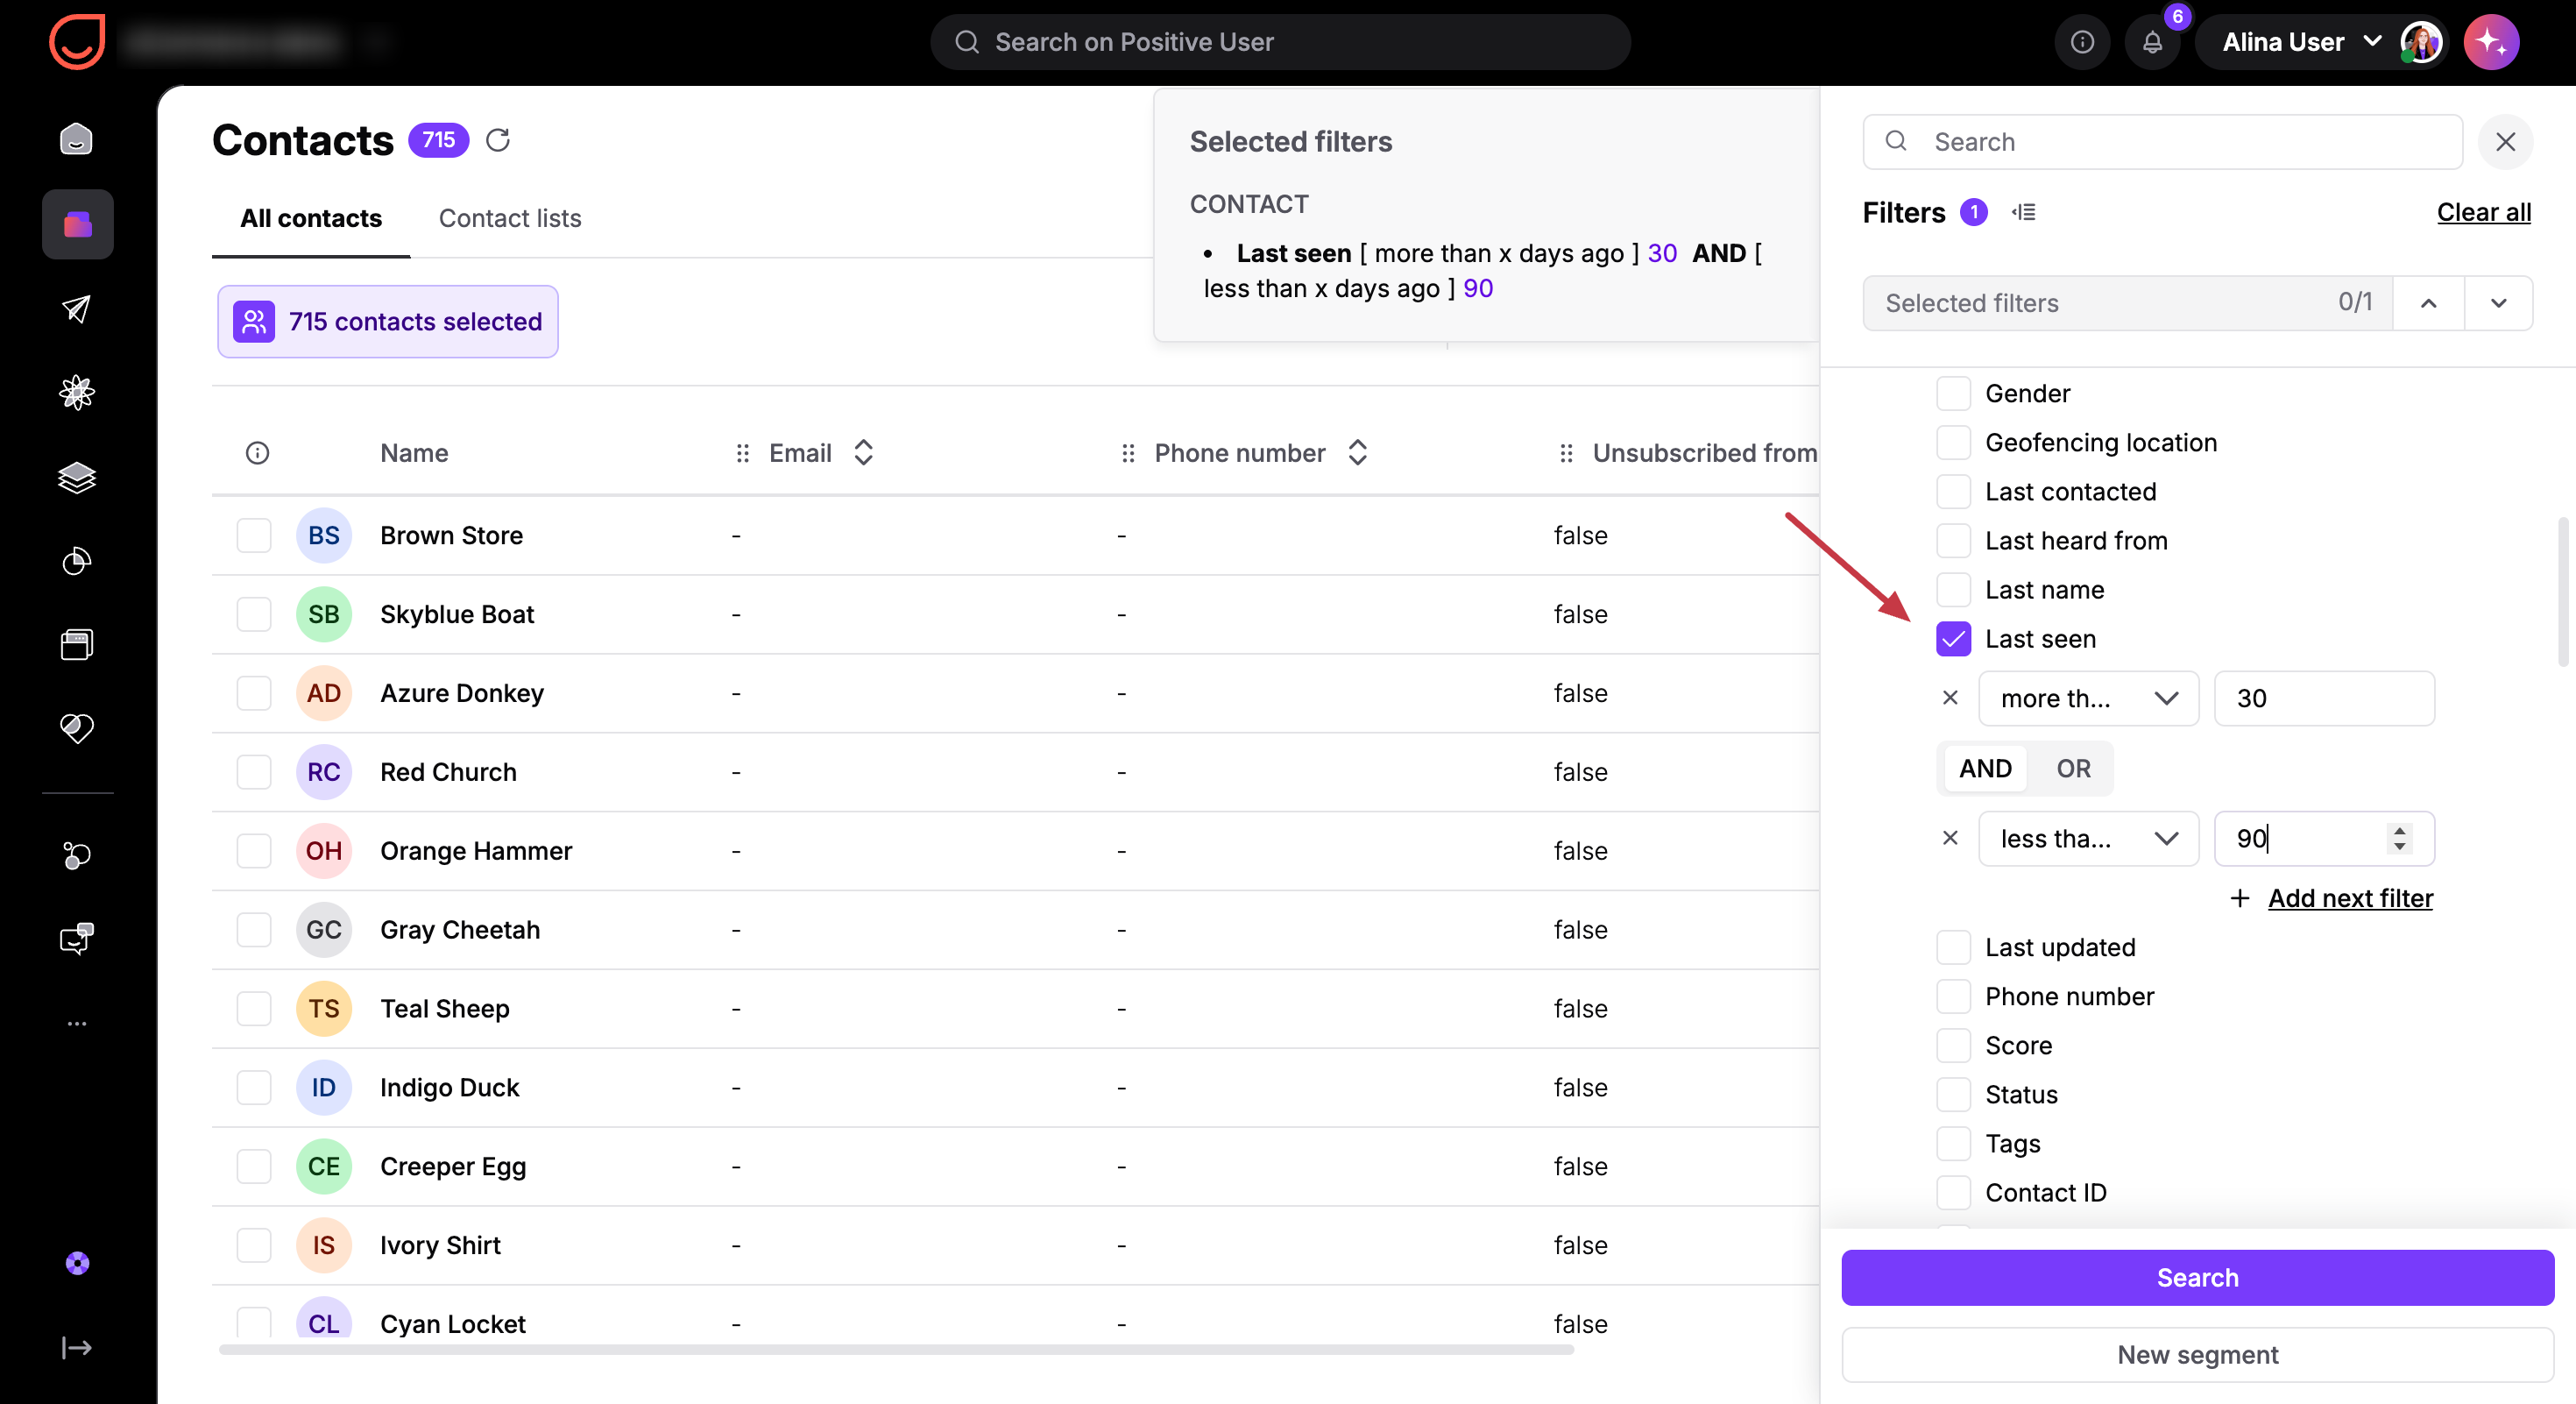
Pinpoint contacts who have stopped visiting your site by evaluating date attributes. Website activity filters help you find contacts who have stopped visiting your site. In Positive User, "last seen" is a standard system attribute with a date data type that automatically records when a contact was active on your tracked website pages. Evaluating this attribute helps you isolate contacts who visited previously but have since gone quiet.
Go to “Data” → "Contacts" and open the “Filters” tab on the right side of the section.
Choose the "last seen" attribute from the attribute dropdown menu.
Set a relative time range by combining "less than X days ago" and "more than X days ago". For example, setting "less than 90 days ago" and "more than 30 days ago" targets contacts who were active in the past but silent for the last month.
Alternatively, choose relative presets like the current month option to review recent drop-offs.
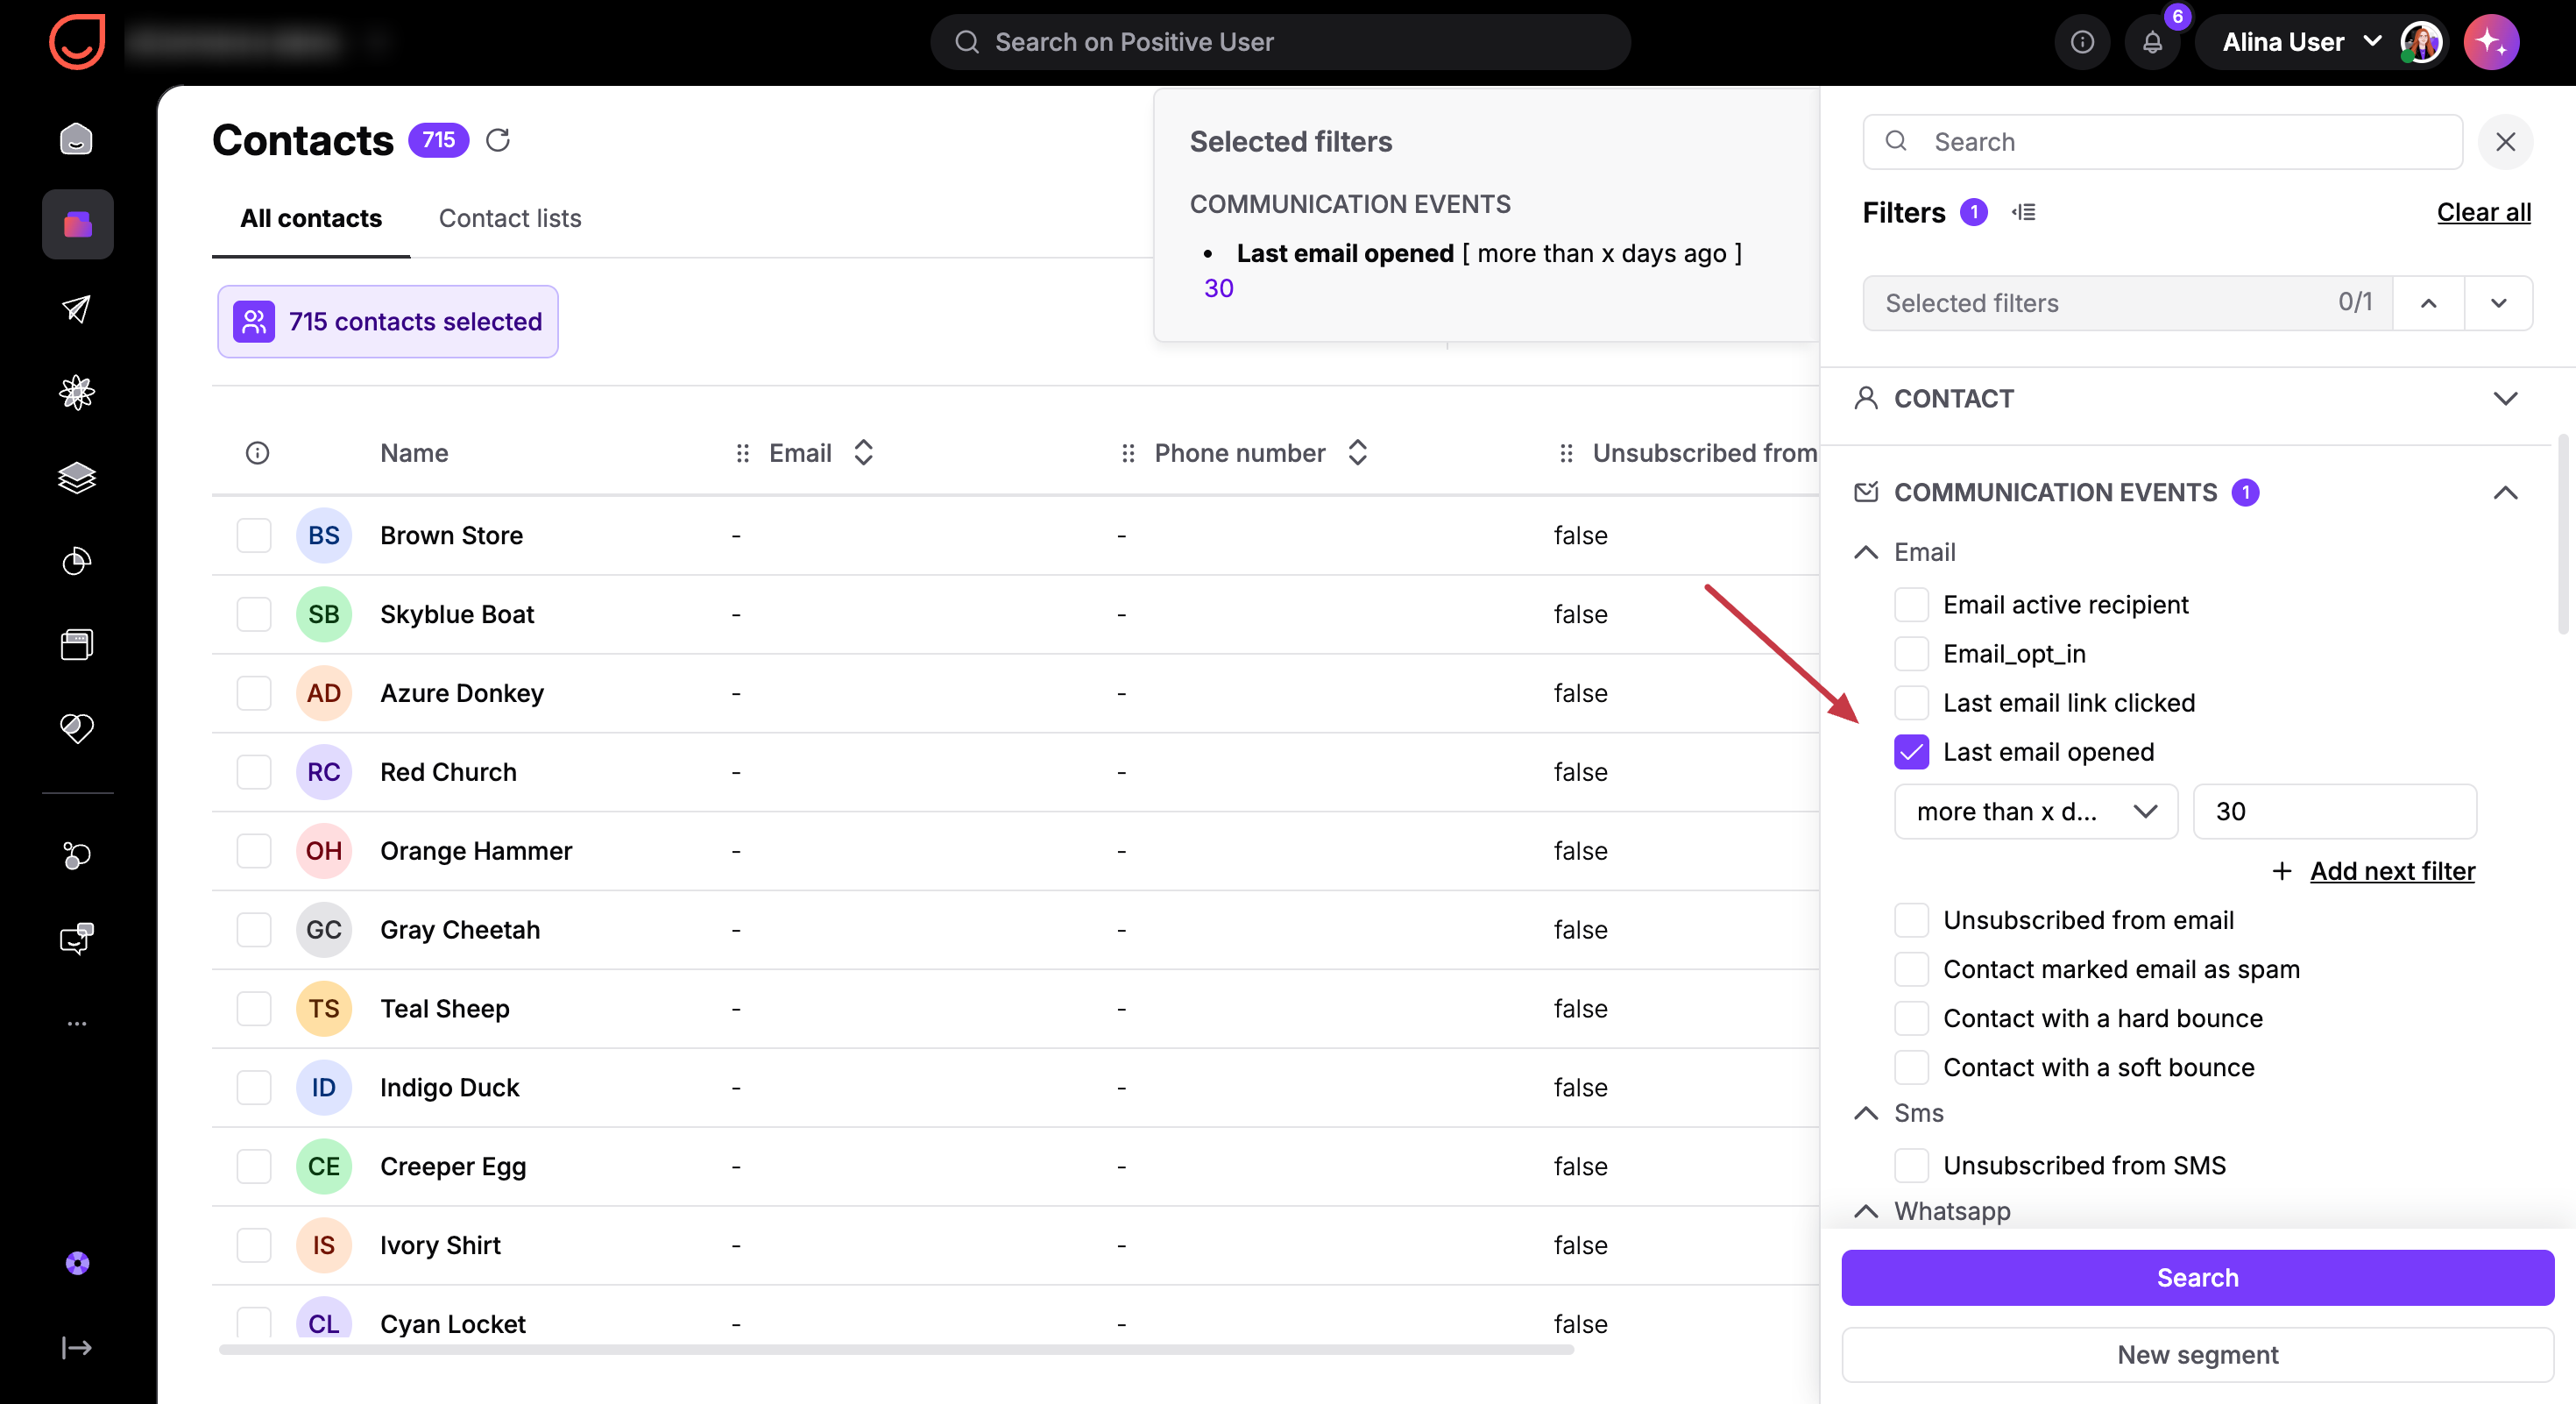
Email activity filters identify contacts who ignore campaign emails and highlight invalid addresses that need cleaning. In Positive User, the "Communication Events" filters section includes campaign interaction markers as well as delivery statuses like hard bounce, soft bounce, and spam complaint.
This section also includes the "Email active recipient" field, which is an automated system marker. The system sets this field to true if a contact has received at least 10 emails and opened at least 1 of their last 10 emails. Reverting this value to false isolates contacts who are unresponsive over email, allowing your team to target them through alternative channels like SMS, Web Push, WhatsApp, or onsite chat messages and pop-ups.
Go to “Data” → "Contacts" and open the “Filters” tab on the right side of the section.
In the filter panel, navigate to the "Communication Events" section.
Choose engagement attributes like "Last email link clicked" or "Last email opened" to evaluate direct campaign engagement.
Select the "Email active recipient" attribute and set its value to false to isolate unengaged email recipients.
Review delivery markers such as hard bounce, soft bounce, or spam complaint to find invalid contacts for database maintenance.
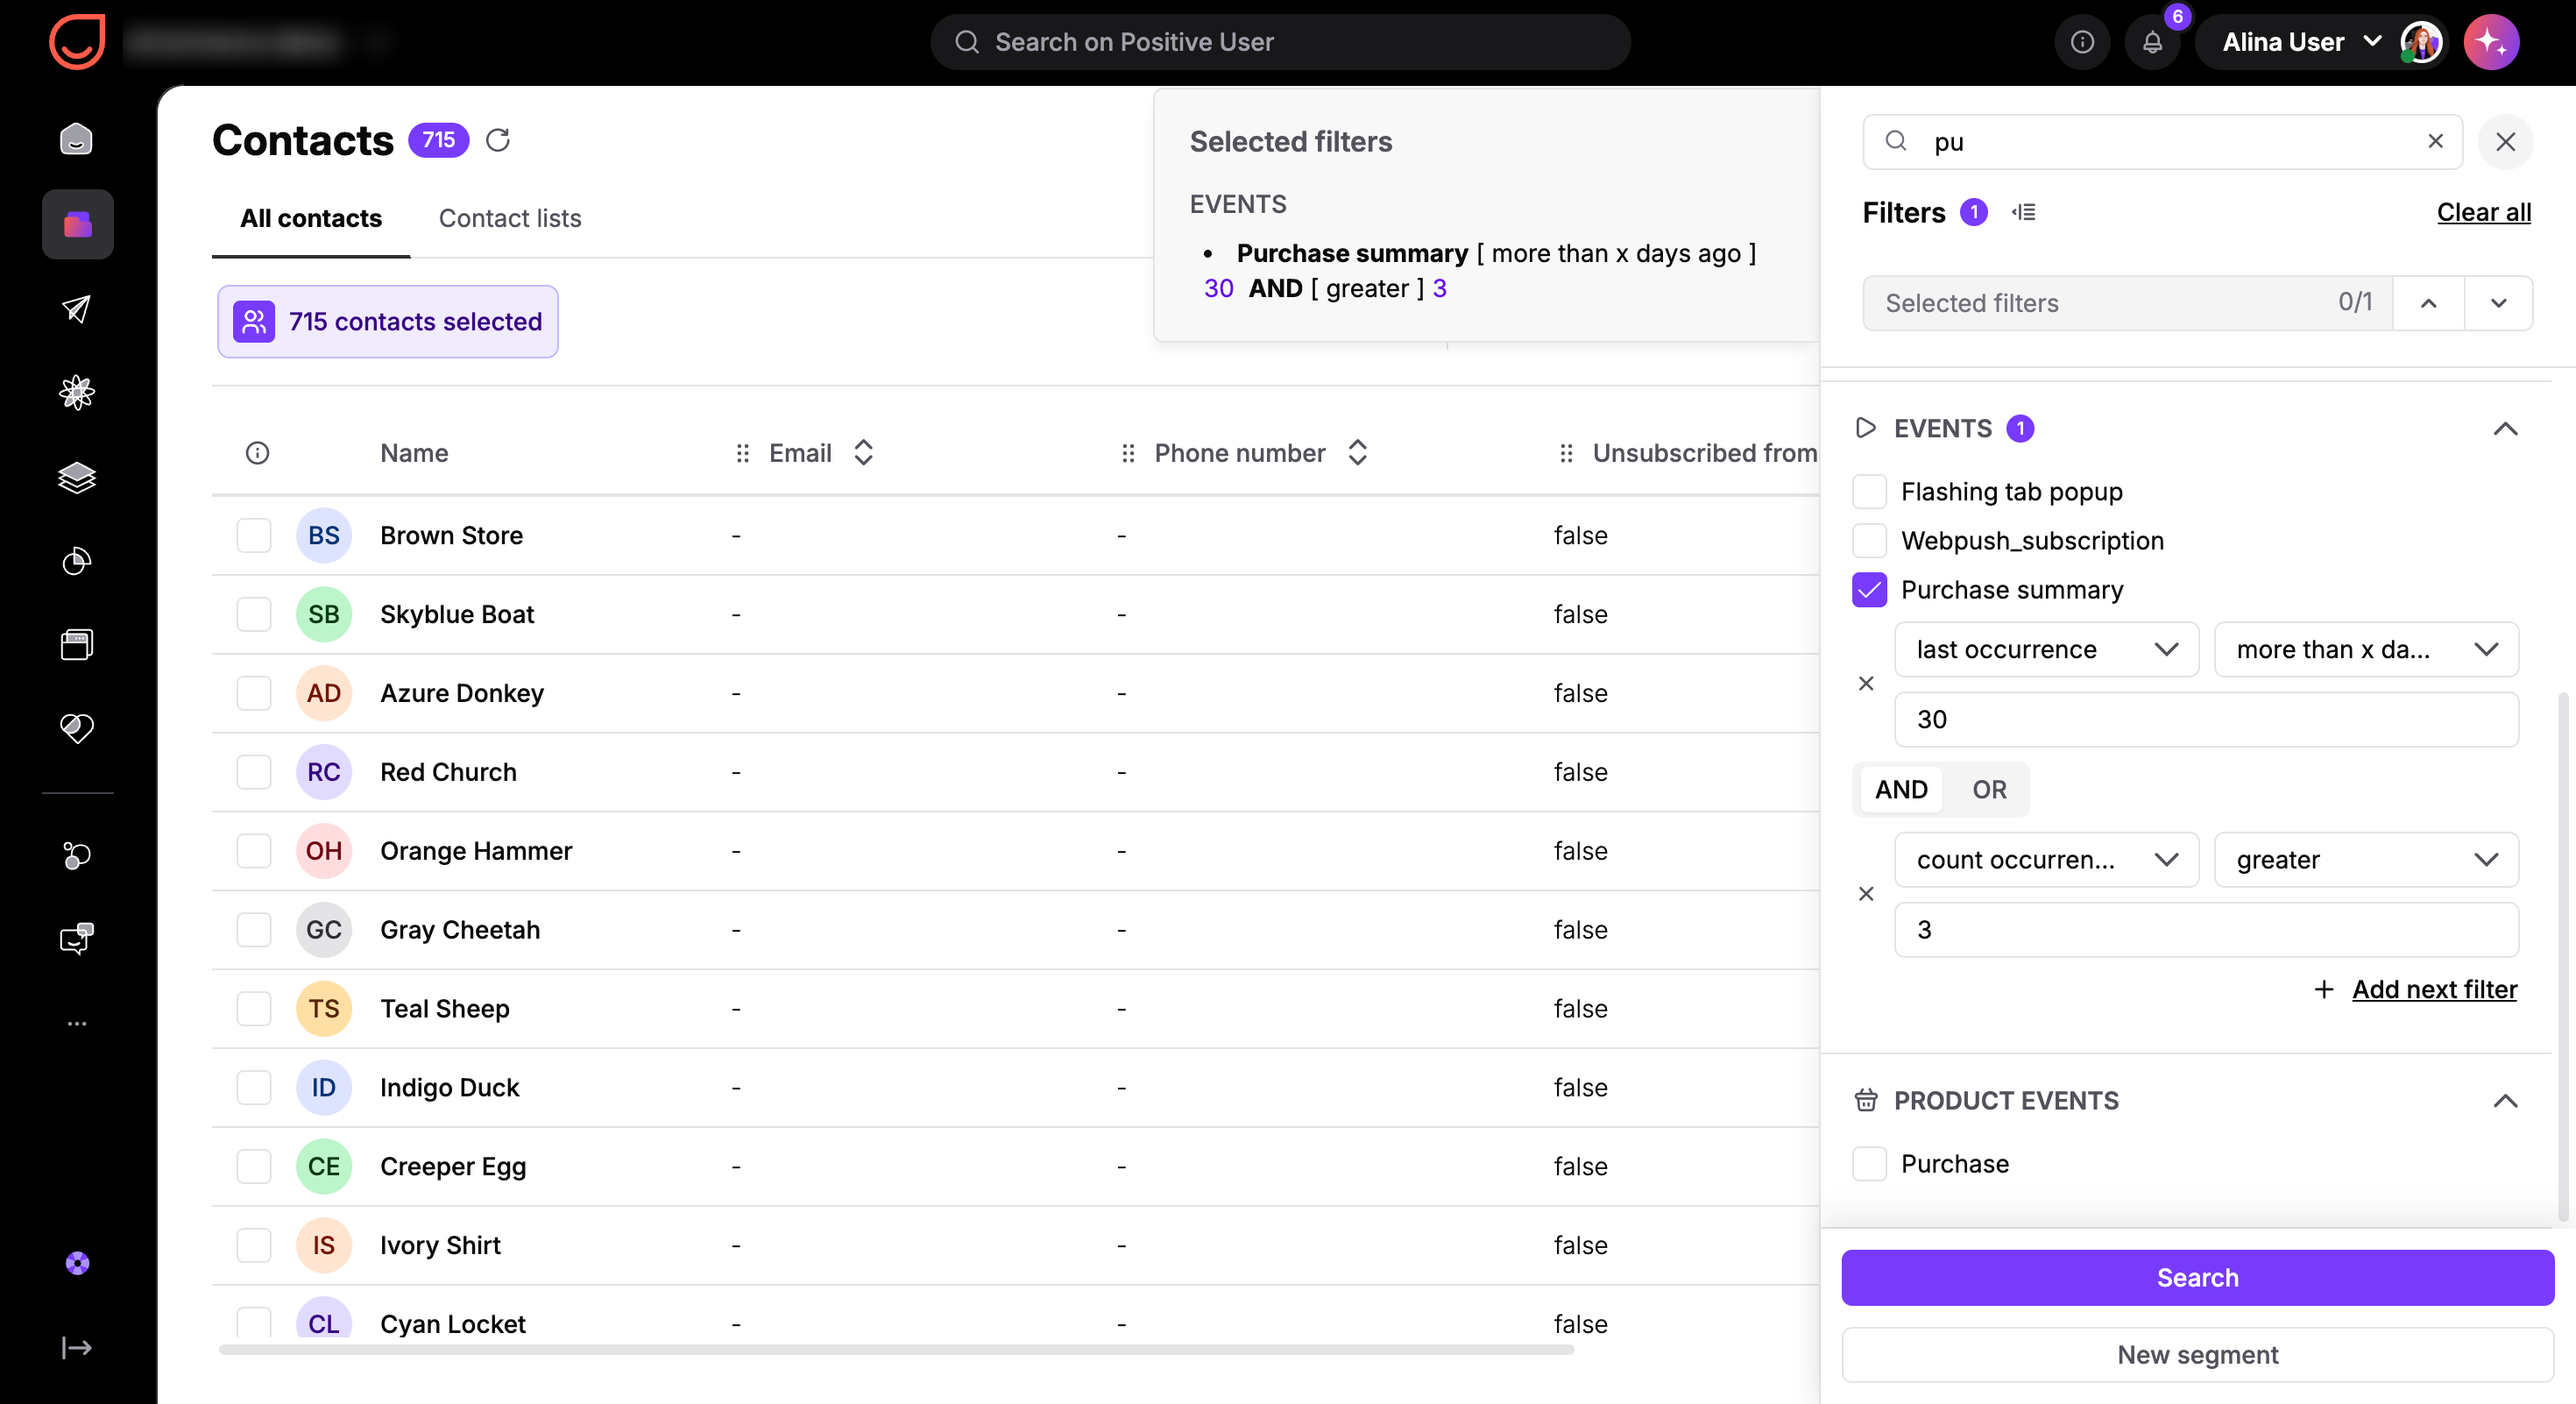
Custom events let your team track meaningful actions across any business model, whether you run an e-commerce store, a SaaS app, an online school, or a service platform. While online stores track events like purchase summary, other businesses can track custom events like activating a feature, toggling account settings, completing a course lesson, or renewing a subscription as clear indicators of contact activity or inactivity.
You can evaluate events by first occurrence, last occurrence, count occurrences, or specific event attributes. When combining multiple conditions, such as finding contacts who completed an action more than twice, but whose last occurrence was over 30 days ago, you need to make sure both rules apply to the exact same event instance.
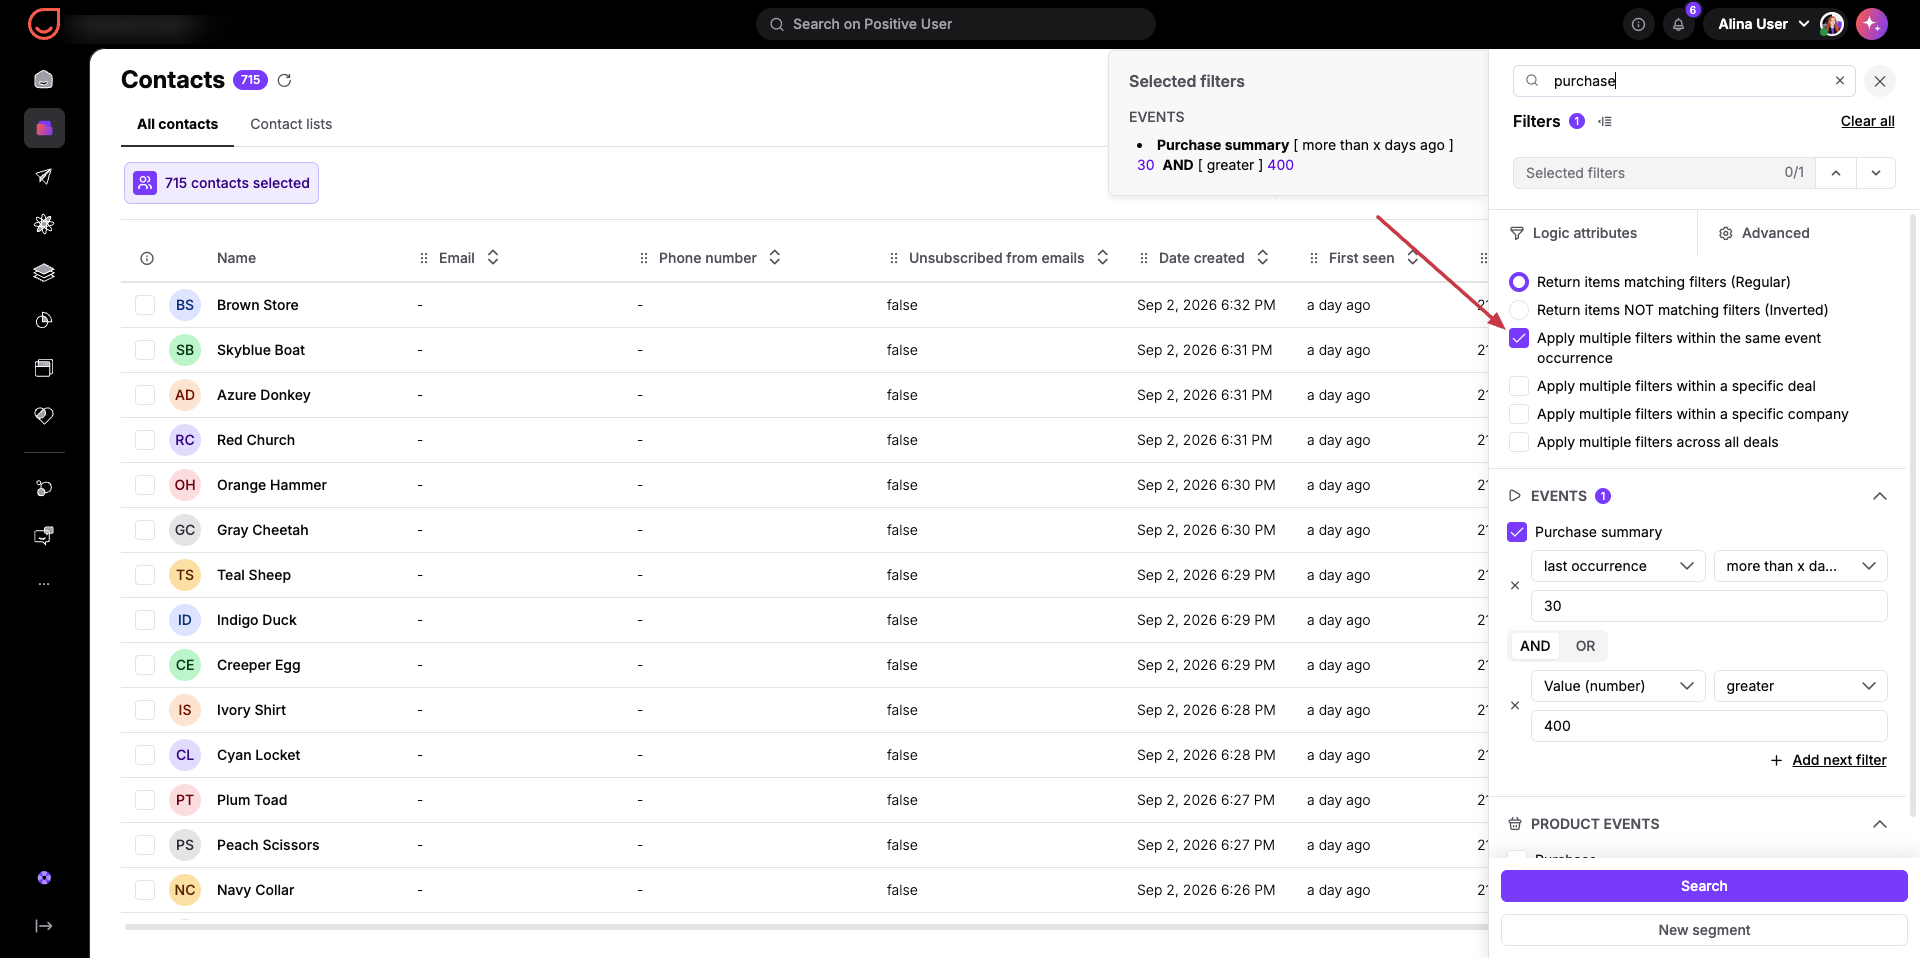
If you want to make sure that the last occurrence had some additional parameter, then you need to check "Apply multiple filters within the same event occurrence" in the advanced filter settings. It ensures both conditions evaluate against a single event occurrence rather than separate events on the contact timeline.
Go to “Data” → "Contacts" and open the “Filters” tab on the right side of the section.
Select your custom event from the event filter dropdown menu in the filter panel. For example, “Purchase summary”.
Add event frequency conditions, such as count occurrences “greater than X” and last occurrence "more than Y days ago".
Go to “Data” → "Contacts" and open the “Filters” tab on the right side of the section.
Select your custom event from the event filter dropdown menu in the filter panel. For example, “Purchase summary”.
Add additional conditions, such as “Total price” event attribute.
Open the "Advanced" filters section and select the checkbox "Apply multiple filters within the same event occurrence" so all rules apply to a single event instance.
Product events represent a dedicated, specific set of e-commerce interaction markers in Positive User like “Add to cart”, “Order”, “Purchase”, etc. Tracking inactivity across this defined list of product events helps your team identify dormant shoppers and launch targeted cart recovery or re-engagement flows.
Go to “Data” → "Contacts" and open the “Filters” tab on the right side of the section.
Choose a product event from the product event dropdown menu in the filter panel.
Filter by event timing, setting the last occurrence to "more than X days ago" or count occurrences to zero.
Combine product event conditions with product attributes if your team wants to isolate contacts who stopped buying specific product categories. Also, you can combine this filter parameter with the website activity of the contact: someone who visits the page, but doesn’t buy anything.
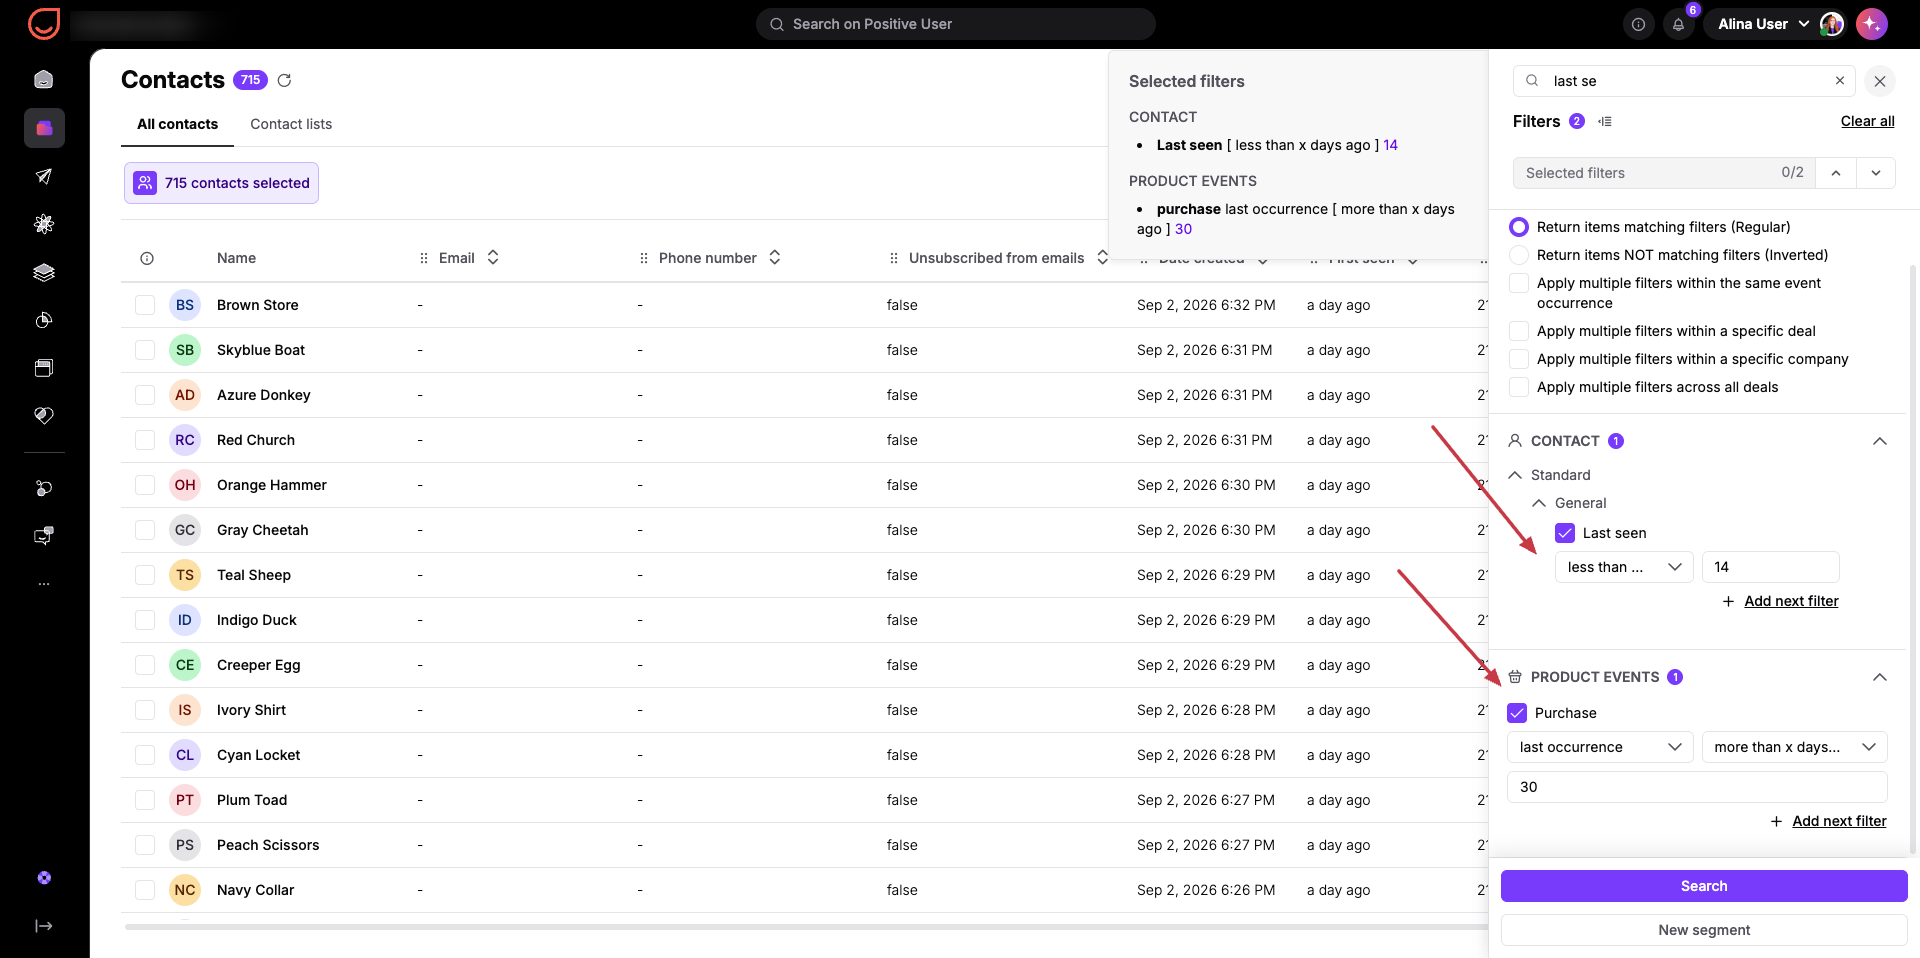
Saving your filter rules into a dynamic segment allows your team to reuse this audience across automated workflows, multi-channel campaigns, and reporting dashboards. Dynamic segments update automatically in real time as contacts meet or stop meeting your filter criteria.
Your team can also connect saved segments to widgets in your analytics workspace to monitor win-back campaign effectiveness alongside the shrinking count of inactive contacts over time.
Review your configured filter conditions in the filter view (to learn more about evaluation rules, see “How Filtering Works”)
Click the "New Segment" button located at the bottom of the filter view.
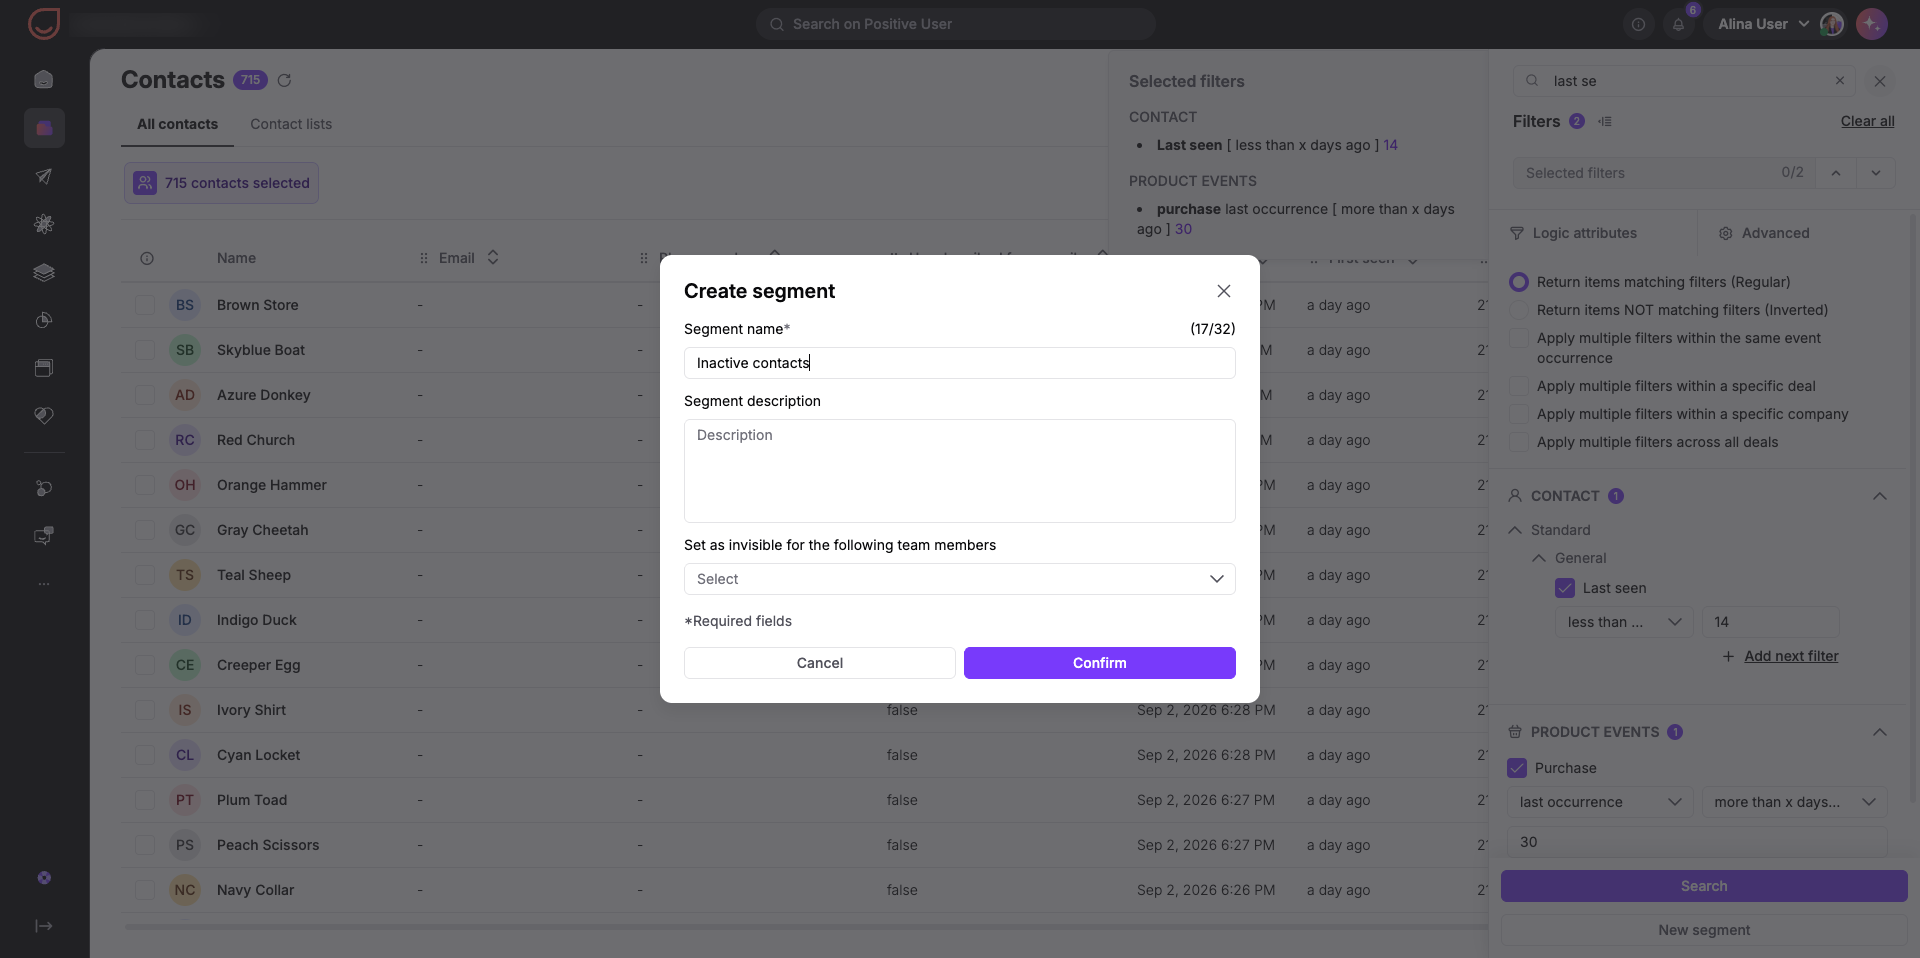
In the setup window, fill in the "Segment Name" and "Segment Description".
Adjust permissions if you need to hide the segment from specific team members who will not be managing these campaigns.
Click "Confirm" to finish creating your dynamic segment.
Fill free to use this segment inside the campaigns, automations and dashboards.
Multi-Channel Re-Engagement Automations: Filter contacts where "Email active recipient" is false, then trigger automated workflows using alternative channels like SMS, Web Push, WhatsApp, or chat messages and popups to re-engage them through channels they actively check.
Database Hygiene and Deliverability: Isolate contacts flagged with hard bounces or spam complaints to clean your contact database, protecting sender reputation and inbox delivery rates.
SaaS and App Feature Adoption: Identify contacts where custom feature events haven't occurred in 30 days, automatically sending warm-up emails or in-app guidance to encourage feature usage.
Reactivation Dashboards: Connect inactive contact segments to custom widgets in "Analytics" to measure how effectively your re-engagement campaigns reduce dormant contact counts over time.